
Originally written for the Yamaha 250F (or 400F/426F/450F) linkage, but the process is pretty much the same for most bikes with rear linkage suspensions.
tools req'd: none (once you get the linkage off)
lubes req'd: a high quality, water resistant moly-fortified (or high Timken-ball-test-rated) lithium complex grease.
other req'd: gasoline, spray solvent, paper towels, Q-tips, toothpicks, tolerant spouse.
step 1:
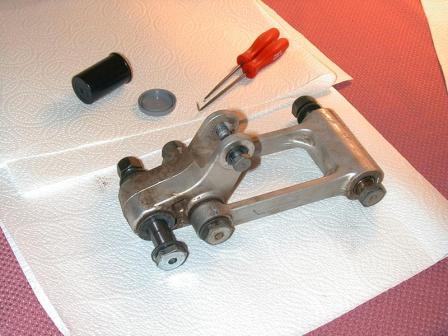
Remove the linkage from your bike. Refer to your manual if you don't know how. Place the linkage somewhere clean, well lit, and where you won't lose the needle bearings when they roll onto the floor. Your kitchen table works well if your wife is not within 100 yards -- but be sure to use the "throw away" tablecloth 'lest you enjoy Hell.
step 2:
Disassemble the linkage, separating it into the "connecting rod" (bigger U-shaped part) and the "relay arm" (smaller L-shaped part). Lay the relay arm aside for now. We are going to work on the connecting rod first. Withdraw the collar from the connecting rod bearing. It goes without saying here that if there is ANY rust inside the bearing, it's time for a new set. The iron oxides that constitute rust are very hard materials; left in the bearing, rust will make quick work of scoring the needles and the races.

step 3:
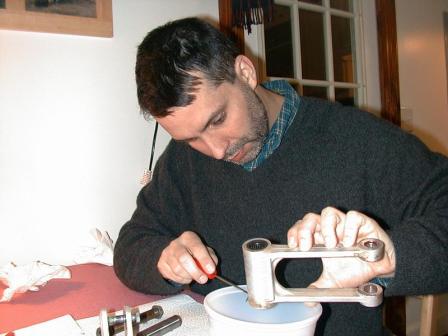
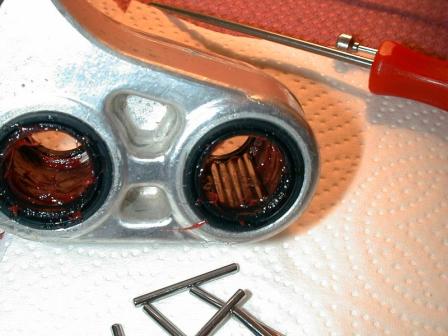
Using a small pointy tool (even a toothpick works), pry up one of the needle bearings inside the connecting rod bearing. Now pry the rest up, and let them fall out the bottom into a small container, such as an empty sherbert tub. (note winter beard, it's 8'F today in NJ.) For production, Yamaha uses a synthetic solid lubricant which doubles as a bearing retainer... So the first time you re-grease your bearings you need to get that stuff out of there. You may have heard the term "string cheese" here on TT, well that's exactly what the yellow solid lubricant stuff looks like. I don't have a pic of the string cheese, as this is my Nth time doing the linkage and the factory cheese is long gone.
step 4:
Time to get stinky. Clean the loose needle bearings, the collar, and the connecting rod itself using whatever means you have. First I fill the sherbert tub with some gasoline, and use an old toothbrush to scrub-a-dub the parts. After I have all the parts pretty clean, I use brake cleaner spray to finish the job. Let everything dry, as you don't want any leftover solvent thinning the new grease. Then i use a couple of Q-tips and some alcohol to make sure the inside races are really really clean. I drop the needles into a 35mm film cannister, along with some alcohol, and swish them around. Then i fish them out with a magnetic retriever to dry on a paper towel. So now you are ready to re-grease the connecting rod bearing. Since things are clean now, it's a perfect time to inspect the grease seals and ensure that they are not torn. If there is any damage, get new seals; otherwise you're going to need a new connecting rod bearing in the near future.

step 5:
Using your grease brush (or your finger), put a generous coating of grease on the connecting rod's internal bearing surfaces. Make a nice layer all the way around. Now it gets a little tedious, but you knew that this part was coming. Pick up a needle, and seat it in the bearing down in the needle recess. Keep it straight. The tack of the grease will hold it in place just fine (don't worry, it's not going anywhere). Place another needle next to it. I sometimes use a toothpick to help position them as they are going in. Repeat all the way around the bearing until one side of the connecting rod is full up with needles. Now repeat these steps again for the other side of the connecting rod. When you are all done, pack even more grease in on top of the needle bearings.

step 6:
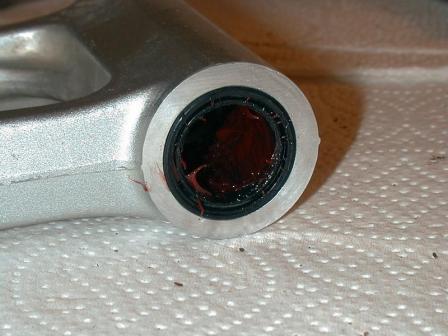
Slide the collar back into the bearing, ensuring that none of the needles get snagged and drift loose. If you used enough grease, you'll have too much and some of it will get forced through as you push the collar into the bearing (that's good). So you are done with the connecting rod, lay that aside; and now do all the same prerequisite work on the relay arm bearing: disassemble, clean with gas, clean with brake cleaner, finish cleaning with Q-tips -- make it shine. If you have been keeping up on linkage maintenance, and water hasn't gotten to your bearings, this is what a NASA-grade clean bearing looks like:


step 7:
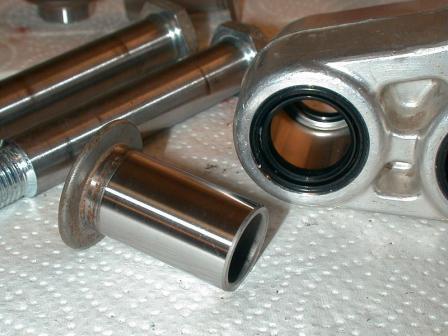
Clean the needle bearings for the final time in some solvent, pull the needles out and then prep the inside of the bearing with a healthy coating of grease.


Start placing the needles into the bearing and work your way around the entire bearing. Repeat for the other bearing.

step 8:
Gob even more grease into the two bearings, and reinsert the collars into the relay arms. Now reassemble the entire linkage mechanism -- HOWEVER YOU MUST PAY CLOSE ATTENTION TO YOUR MANUAL REGARDING THE ORIENTATION OF THE BOLTS! If any one of the bolts is put in backwards, the attached nut will hit the swingarm and you will do lots of damage to something that is expensive. DO NOT USE MY PICTURES AS A REFERENCE FOR BOLT ORIENTATION -- Always consult your manual for the proper bolt orientation during re-installation of the linkage onto your bike.
step 9:
Clean up, wash hands, get wife to admire your handiwork


Wife makes comment about relative importance of things, take wife out to dinner immediately.
step 10:
Now start in on the swingarm bearings... 
Note:
More info on greasing your linkage bearings -- and details specifically for the Yamaha 250F's -- can be found in this Yamaha 250F FAQ page:
http://www.thumperfaq.com/swingarm.htm
Also note that there are several links at the bottom of the 250F FAQ page which hold even more useful information.


Recommended Comments