Jump to content

Wire locks are one of the most common wrist pin locks used in today's powersports pistons. Correct installation is crucial to avoid a catastrophic failure, but the task can be frustrating. Here, we go through important tips and tricks to ease your wire lock installation and make sure you're up and running reliably. The devil is in the details!

When rebuilding an engine, there are a handful of tasks that—no matter what you do—aren’t particularly pleasant to perform. For some, it may be meticulously cleaning all the parts, while for others, it may be undertaking all the necessary measurements of critical components. However, the focus here is on reducing the frustrations many builders experience when installing wire locks in their pistons. Not only can wire lock installation be frustrating, but installing them correctly is incredibly important to ensure the engine performs well for a long time.

je_pistons_wire_locks-4.JPG.73229f0eaf8421818c83649501a09a7a.JPG

Installing wire locks can be frustrating at times, but this critical step can go smoothly with some tips and tricks. Read on.

Unfortunately, for many builders, installing wire locks can go south in a hurry. Catastrophic engine damage can easily be caused by improperly installed wire locks. This story isn’t all that uncommon, and many probably know of someone who had a similar experience.

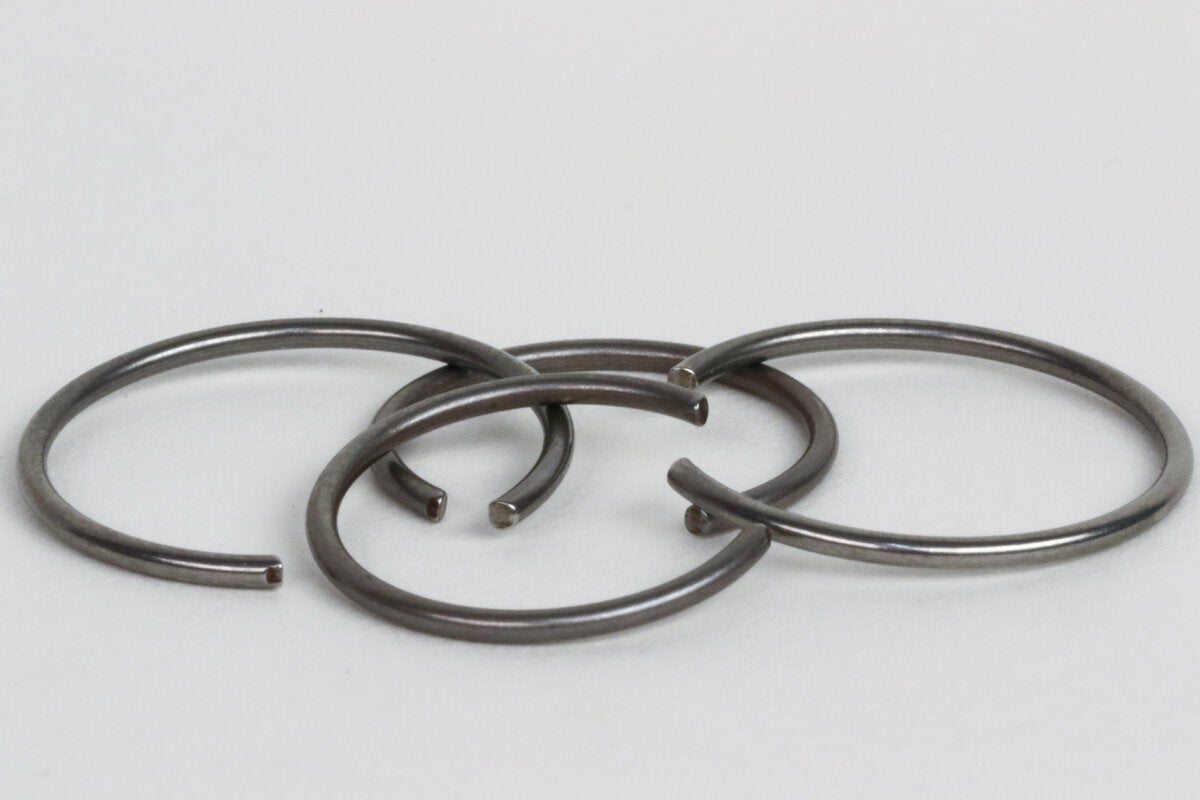
Wire locks serve an essential function and are used to retain the wrist pin in the piston in many engine applications. The wire locks themselves are merely circular shaped sprung pieces of wire. They are designed to locate in lock grooves in the wrist pin bore of the piston and stay in place via spring preload.

Looking for a new piston for your bike? Search it up on JEpistons.com or give 'em a call at 714-898-9763. And don't forget to follow these tips!

je_pistons_wire_locks-6.JPG.5ede47ad4c5e5b7b296dd6b5b4ebcaa9.JPG je_pistons_wire_locks-9.JPG.614d6b97d60d330626163287f633046f.JPG

Wire locks are simply sprung pieces of wire designed to seat into the lock grooves machined into the pin bore of the piston to keep the wrist pin in place.

Failures Caused by Wire Locks

Wire lock related engine failures typically occur for a couple reasons. First, failures can occur because the wire lock was not correctly seated in its corresponding groove. Second, failures can occur because the wire lock was deformed during installation, and thus lost preload, allowing it to evacuate its groove during engine operation. Shoddy or poor wire lock installation efforts can also damage the wrist pin bore by marring the bore surface, which increases friction in the joint, and in severe cases, can cause the wrist pin joint to overheat, leading to a small end failure.

je_pistons_wire_locks-14.JPG.05e187461547fbcd4d6798a08bed5d6d.JPG

Incorrect wire lock installation can easily lead to catastrophic failure. In this example, one wire lock was improperly installed in a motorcycle engine, allowing the wrist pin and small end to move freely.

The orientation of the open end of the wire lock can be an important factor and should be carefully considered before installation. In combination with physics, the dimple incorporated into the piston to aid in wire lock removal plays a key role in determining where to position the open end. In many applications, the open-end position is usually designed for either the 12 or 6 o’clock positions. When the piston is changing direction at top dead center (TDC) and inertia loading is high, the wire lock presses harder into its groove when in 12 or 6 o’clock positions. While those positions are optimal from an inertial loading standpoint, many engine designs also utilize 3 and 9 o'clock open end orientations as well. The above statements are general advice, and you should always consult your service manual or the instructions supplied by the aftermarket manufacturer for orientation directions specific to your application.

je_pistons_wire_locks-24.JPG.4ae12f8ffdfa7904cbfd40abc39193a8.JPG je_pistons_wire_locks-23.JPG.2ea367db856c7648577bfd2db2d7d583.JPG

12 and 6 o'clock wire lock open-end orientations are common for many piston designs due to inertia loading during engine operation. However, always be sure to follow specific instructions provided with your pistons.

je_pistons_wire_locks-12.JPG.b8f2579cdac0d68bc5aa7394bf2d5c75.JPG

Correct open-end orientation will vary based on piston design, but always be sure the open end is NOT in-line with the pick-lock relief. This relief is simply there to aid in wire lock removal. Running an engine with lock-ends lined up with this relief could result in wire lock failure.

Wire Lock Filing

Wire locks should be installed by inserting the open end into the groove first, by hand, without the use of any special tools. Prior to installation, ease of installation can be greatly improved by carefully rounding the ends of the wire locks with a small diamond file. Due to the manufacturing process used, often, wire locks have small burrs on their ends which make sliding them into their grooves especially troublesome. Carefully removing these burrs and rounding the ends greatly improves the lock’s sliding ability and reduces the likelihood of scratching the wrist pin bore.

je_pistons_wire_locks-13.JPG.784a8417eb5171ea39d2e14a87cb5278.JPG

It's recommended to file down the sharp edges of wire lock ends before installation. This will make the process easier and lessen the chance of damaging the lock groove or pin bore.

In many applications, it is possible and preferred to install one wire lock into the piston before assembling the piston to the connecting rod. Unless your service manual states that the wire lock must be installed in one side or the other, we recommend taking into consideration which side of the engine will be easiest to install the remaining wire lock. Engine architecture and considering which hand of the builder is dominant are often the primary drivers behind deciding on which side to install the lock first.

Individual builders may have different hand motions and techniques when it comes time to installing the first wire lock into the piston. However, there are a handful of tips and tricks that can be applied to make the job easier. First, perform the installation over an area where botched attempts will not leave the wire lock inside the engine or forever missing on the shop floor. We can assure you many hours have been spent hunting for wire locks that have careened off course.

je_pistons_wire_locks.JPG.0d9b433e044da7314c7493f87e6d1883.JPG

Installing Wire Locks

Insert the open end of the wire lock at about a 45-degree angle and use both thumbs to compress the wire lock into the wrist pin bore. Usually, by doing this, it’s possible to get the open ends of the wire lock started in its groove and the opposite end to stay stationary in the wrist pin bore. At this point, you can reposition your fingers so that the wire lock can be pushed all the way into its groove, or a small flathead screwdriver can be used to push the wire lock in the rest of the way. The wrist pin can also be inserted before attempting to install the wire lock to serve as a backstop while navigating the open ends into the groove. Once the lock is completely in the groove, push the wrist pin against the lock and give the opposite end of the pin a tap to be sure the lock is fully seated.

je_pistons_wire_locks-18.JPG.a1c1c340c2ab0a8b8e72aca564c490f5.JPG je_pistons_wire_locks-20.JPG.dbc288acb32d07416c7d5af2e96c9a07.JPG

Insert the open end of the wire lock first without using any special tools. Once that end is seated in the groove, you can either use your thumb or carefully use a tool to push the remainder of the lock into the groove.


Once you believe the wire lock is seated in its groove, it is incredibly important to verify this is the case. Use a small screwdriver and apply light -to-moderate pressure to try to rotate the lock in its groove by pushing on one of the open ends. Any wire locks that can be rotated in their grooves have been damaged and should be replaced. A properly installed wire lock should not rotate in its groove under moderate load.

je_pistons_wire_locks-30.JPG.ee942b8dd80d76e622833461a7bab73b.JPG

Be sure your lock doesn't rotate too easily in the lock groove, as this could be a sign of a damaged wire lock.


The same installation tips can be applied to the remaining wire lock once the piston is assembled to the connecting rod. One tip worth mentioning before installing the remaining wire lock entails lubrication advice. Since wire locks are not designed to rotate in their grooves, it is our preference not to introduce lube oil of any kind into the wire lock grooves. Thinking through the sequence of where and how assembly lube or engine oil is applied to the small end components can reduce the likelihood of getting lube into the remaining wire lock groove. Usually, it is best to carefully coat the wrist pin bore and rod small end bore, as opposed to the wrist pin, so that lube oil isn’t scraped off the wrist pin and deposited in the wire lock groove.

Before installing the remaining lock with the piston fixed on the connecting rod, cover the crankcase with a clean lint-free rag so that the wire lock cannot get lost in the engine on a botched attempt. Remember to use the wrist pin as a backstop and install the open ends in the correct orientation. Once installed, be sure to check that the wire lock has fully seated and cannot be rotated.

  • Like 5
  • Helpful 8
  • Haha 1

User Feedback

Recommended Comments

Circlips are OK, but we always use Spiral Locks in competition 8 cylinder engines with floating wrist pins. Some builders use Teflon "Buttons", but these can wear and degrade if rebuilds are deferred. Beyond that, It's not uncommon to encounter wrist pins that exhibit some amount of end play. I can say categorically that ANYTHING more than ~ .025" of end play MUST be shimmed, typically by cutting sections of used or new wrist pin to insert on both sides of the floating pin. This not only fulfills the the function of maintaining the intended balance used in the bob weight spin balance operation, which is designed into the "dynamic" balance, and it also prevents "Pin shuttle", A situation where the wrist pin moves laterally in a resonant motion that can literally pound a circlip out of its groove.

While this phenomenon may be less common or perhaps not problematic on 2 or 4 stroke single cylinder engines, I believe it is still a factor to be aware of. I've seen the damage that occurs on racing multi s--such as sprint car engines. I've seen properly built engines run an entire season without any sort of rebuild, while others rebuild every race or 2, and piston/ring issues are often "blamed", but I've personally seen some of these parts with ejected circlips or worn out buttons--both conditions resulting from improper assembly.

Just my .02 FWIW.   Regards, Mike

  • Like 3
Link to comment
Share on other sites

18 hours ago, Blutarsky said:

I don't have that one, but a similar one, that has never worked for me (so far YZ250, YZ450, KTM 85 all no)

Here is the one I've got:

https://www.accu-products.com/accu-products-specialties/c-clipper-circlip-installation-tool-2-stroke-model.html?page=all


edit: issue is the inner portion doesn't leave enough clearance, so it won't insert fully and won't seat the ring.

Edited by Hick
  • Like 1
Link to comment
Share on other sites

17 hours ago, lowmass said:

been building/racing bike engines for 4 decades and have never once seen the " issues" discussed here.

I have also and was thinking the same thing....?

Link to comment
Share on other sites

I use a wood popcycle stick from a craft store. Held in my hand like a pocket knife carving upward (like your not suppose too). Reaching over the piston from other side manipulate it to lift and push the wire in after starting 1 leg of the clip. Wood won't scratch the piston. Best tip is to have at least 1 extra clip,  so when it shoots across the shop, you can find it later.

Link to comment
Share on other sites

On 3/5/2021 at 1:28 PM, lowmass said:

been building/racing bike engines for 4 decades and have never once seen the " issues" discussed here.

5 decades for me, same thing. I've done this many times on 2 cyl sled motors with 1 cylinder still in place blocking the back side access. If you install the blind side clip on the bench, cover the crankcase with a cloth and just use your thumbs it takes about 30 seconds for the entire process. A 3rd hand just gets in the way.  Add another 30 seconds with the right sized deep well socket to test or seat the clip. 

Link to comment
Share on other sites

6 hours ago, tomd1145 said:

5 decades for me, same thing. I've done this many times on 2 cyl sled motors with 1 cylinder still in place blocking the back side access. If you install the blind side clip on the bench, cover the crankcase with a cloth and just use your thumbs it takes about 30 seconds for the entire process. A 3rd hand just gets in the way.  Add another 30 seconds with the right sized deep well socket to test or seat the clip. 

What's his nuts out west?  Oh yeah Slavens racing. He has those special clips for ktm. Why can't someone do that for our japanese bikes? I said it so I'm willing to split proceeds 50 50. Royalties. You understand, right?  

Edited by FLO_RIDA
  • Haha 1
Link to comment
Share on other sites

Put a lot of motors together over the years. Never encountered any wire locks near as tough as those in a J.E. piston for a big bore XR650L. I'm a carpenter so I used oak dowel to help the install. One slip of a metal tool can injure and cause piston damage. Still a lesson in patience

Link to comment
Share on other sites


Create an account or sign in to comment

You need to be a member in order to leave a comment

Reply with:


  • Similar Content

    • By Shane Enoch
      just redid the top end on my 2022 EC 300, only because it was time and I had not done one and I had reached 80 hours, after I put the new piston and everything in it got it all back together the bike fires right up, but it feels extremely sluggish, it also is blowing a ton of smoke out the exhaust now. Can anybody point me in the right direction of what I need to look at in this case? 
       
      bike was running fine prior to me doing this. I only wanted to do it because it was time to get it done but now it’s smoking like crazy 
      does the oil pump need to be tuned or anything when you redo the top end?
    • By Bizzidy
      Hey TT’ers, 
      i picked up a 2003 KTM 300 exc about six months ago. It starts but runs pretty poorly. Lugs ok but won’t get on the pipe. 
       
      It cost $1800. Here in Northern CA that’s dang near as low as bikes go, even ones that need work. 
       
      I have a fair amount of experience with rebuilds so I figured I’d get it going and sell to someone getting into trail/enduro riding. 
       
      Based purely on how it rode I was assuming the piston was bad and compression was low. I figured that will be an easy fix. Being 20, now 21 years of age I expected it could need a full rebuild but was ready to give it a go. 
       
      upon taking the top end down and inspecting the piston I found that the piston is brand new!  As I started taking down the power valve I found the problem. A couple retainer screws had come loose in the power valve and were inhibiting function. 
       
      it appears this may be the only issue with the bike!  Score!
      so I’ll buy an new complete top end gasket kit and I am also feeling like I should buy a new piston too. It appears the previous owner installed the piston incorrectly and it got very scratched up. I think the rings weren’t set into the grooves with the gap at the indexing in and they scraped up the outside of the piston. Whatever happened it looks pretty bad. 
       
      here are some pictures. Would you replace the piston in this case?
      ring gaps were 16 thousandths and 24 thousandths. 


    • By BikerboyD
      CAN I HONE A KX 100 cylinder ? Is it nikasil or plated LMK ! Doing a top end soon 
    • By Dos_Ruedas
      Hey fellow riders!
      quick back story to what’s going on with my 04 CR250
      Bought about a year and half ago and had been sitting for idk how long but original owner said it needed carb work.
      Got it home and started the tear down/ rebuild. throttle slide was chipped and causing gas to overflow out the overflow bowl and finally Got it running for about 30-45 minutes but would not hold idle kept bogging out unless the throttle was rolled back like just a fuzz hair. After adjusting and thinking I had it right the bike blew up. Got it back in the garage took off the top end and exhaust bridge was cracked.
      Sent the top end to get resealed via PowersealUSA and got it back and got it all back together. My dilemma is trying to figure out what caused it to die.
      could it have been already toast or could it be when I was adjusting carb to try to get idle or intake screw adjusted I adjusted to lean and it didn’t let enough fuel/oil into the cylinder and caused it to run hot/ dry and that what caused it to stop running?
       
      also could it be RC valves not adjusted properly?
       
      I have watched just about every video on YouTube and best explained by Greg Hitchco and Brian mobleys how to set up valves but also sent my valves in to be blasted and they are sticking a little upon re install but I think I have them as good as I can that they are moving up and down pretty freely now but the cables and servo motor would be controlling the valves once hooked up and should be controlled with the motor but any thoughts help advice would be much appreciated. I just got 700-800$ in the top end with the reseal and top end kit and probably more but just don’t want to blow it up again and make sure it’s all good before I try to crank it and risk blowing it up again if it is carb or jet or rc valve issue.
       
      just trying to find some answers if i should maybe start by putting stock main and slow jet in and air and intake screw like 2-3 turns out and see how that works? 


×
×
  • Create New...