Search the Community
Showing results for tags 'Brake'.
-
The 79 Honda XR185 has no battery. All loads are 6volt. So the taillight naturally only has two wires which run to ground and the lighting switch. How could you wire in a brake light switch using 3 wires (ground, brake, tail) into the 2 wires?
-
I wrote this when I was a member of another board. My guide was written for sportbikes, but it all applies. I'll submit this for consideration as a 'sticky' if the board admin wants to use it. -- Replacing and/or bleeding brake lines. Nothing short of pulling a bank of carburetors causes the average sportbiker more distress. I for one believe braided lines are one of the best bang-for-the-buck mods you can do for your motorcycle. Maybe the very best mod a guy can do for a around a hundred bucks. You get better braking feel and increased stopping power because the lines don't expand under pressure like the cheap rubber OEM ones do. And trust me on this, doing the work is not nearly the black art you might think it is. Now that you've decided to make the leap, go ahead and buy your line kits from wherever you like. There are some great site sponsor e-vendors right here on Thumpertalk who can help you out, I'm sure. You can get your fluid and Speedbleeders from them too (I highly recommend the latter purchase - you'll need three and they're ten bucks apiece, well worth the cash). As for the whole debate on what brake fluid to use, guys get excited about synthetic DOT 5.1; the selling point on this stuff is that it resists boiling better than DOT 4 and is less "hygroscopic" too - which means it tends to absorb less moisture over time than DOT 4. However, unless you're talking about a dedicated track bike, I don't see the value. It's typically more costly than plain-jane DOT 4 and cannot be mixed with anything else if you're low on fluid and in a pinch. Fresh DOT 4, changed out once a year in the spring, will serve you just fine and will cost you less. Thus, I suggest you simply order a bottle of Galfer Super DOT 4 (or any other name brand) when you order your lines and Speedbleeders from the vendor of your choice. I would also recommend the purchase of a basic Mityvac Brake Bleeding Kit, the cheap plastic one that sells lots of places for $25 or $30. (For some reason, CycleBrakes.com is about $15 higher than they should be on this tool.) Don't get intimidated by the relatively lengthy instruction manual that comes with the Mityvac. In fact, you just as well toss it in the trash. This tool is a simple vacuum pump, nothing tricky about it. Affix the clear vinyl tubing to the pump with the inline capture cup attached and you're ready to go. Let's start with the front brake lines, shall we? 🙂 Put your bike on front and rear work stands, or a rear stand at least. You want it level and sitting on a solid, stable platform. Remove your windscreen and set it aside. It's easier to work on the front of the bike w/o the screen on, and this way you avoid mucking it up with a spilled drip of brake fluid (more on that later). Put some old towels on top of your instrument cluster, fairing, and fuel tank too. You should have some plastic clip-type fasteners which hold the factory lines to the back of the fender. Remove those so the midsection of the lines are free. The first thing you'll use the pump for is sucking out the bulk fluid from the reservoir cup. Unscrew and remove the plastic cover, insert the free end of the vinyl tubing, and pump to your heart's content. Easy as pie. Next you'll want to drape some more towels on the bottom half of your front wheel because you will still have fluid in the line, and when you unbolt it from the caliper, it's going to dribble some. (Note: at the risk of insult, the hex-head fasteners which attach the lines to the master cylinder and calipers are called banjo bolts, so that's what I'll refer to them as from here on out.) Just have a jar or bottle handy so you can put the leaking free end of the stock rubber line inside to catch the majority of the draining fluid. A word on working with brake fluid: don't flip out if you get a drop on your fork, caliper, wheel or other painted surface. Stay calm, wipe it off with a dry paper towel (more absorbent than a cloth towel) and you'll be fine. You might want to clean the now dry spot with another paper towel and some Honda Spray Cleaner & Polish (to this day, I love Honda chems!) if you're really worried about it. The point is, people talk about brake fluid as if it's nitroglycerin or something sure to ruin your bike the instant it touches anything painted. Not true. Be careful, wipe up spills, and you'll be fine. Okay, once the majority of the fluid in the line has drained, unbolt the banjo at the master cylinder up top on the right clip-on. Have a paper towel ready to capture any drips from the top of the line. Carefully thread the line down through the fairing and out the bottom of the bike. You'll be tossing it, the OEM banjo bolts, and all used crush washers (new ones come with your Galfer kit). Get the new lines ready. The front kit is a two line affair with a long and a short line. Take a look at the back of the package - it'll tell you where to place the new crush washers, how many to use, etc. (basically at each and every 'joint'). The short line is the right side which will go against the master; the left line rides on top of it. Bolt everything up, make sure the lines aren't binding on anything at full lock, then torque to 12 to 15 ft-lbs. Unscrew and remove the stock bleeder nipples from both the right and left calipers. Again, you may get a drip. Just have a paper towel handy, this is not the end of the world. Replace the stock bleeders with the new Speedbleeders you bought. No need to seal the threads with Teflon tape or wheel bearing grease as the SB's come with thread sealant already applied. Tighten them down with a small wrench, but don't overtighten. Now you're going to attach the Mityvac to the left caliper's SB via the clear vinyl tubing. Set it down and get your bottle of DOT 4. Carefully pour it into the reservoir cup, almost all the way to the top (just leave enough room that it doesn't spill if you jiggle the bike a bit). Unscrew the SB 1/4 to 1/2 a turn. Begin pumping the Mityvac. You'll see fluid begin to disappear from the cup. Now you're beginning to prime the lines. At first you'll be sucking only air and you'll have to stop pumping from time to time so you can stand up and pour more DOT 4 into the cup (you don't want to let it get sucked dry because that means you've drawn air into the system and you'll be starting over). Eventually (it really doesn't take too long), you'll see fresh brake fluid coming out of the SB, through the clear tubing, and into the catch cup attached to the Mityvac. Keep pumping and pouring until you get mostly clean fluid coming through without big gaps of air pockets (small bubbles will remain, but don't fret, we'll take care of them in a few minutes). By now you might want to unscrew the Mity's catch cup and dump the fluid into another container. Snug up the SB on the left side. Go around the bike and prime the right line in the same manner described above. Once you get mostly clean fluid coming through, you've got both front lines primed and you're ready for the final bleed. At this point, you're done with the pump. You can remove it, leaving yourself a length of clear tubing to attach to the SB's and the catch cup at the end. I like to go back to the left side caliper and start the final bleed there because it's the longest line, but I have no scientific reason to support why I do this. I think you could begin on either side and have it work out just fine. Again, you'll want to back out your SB about a 1/4 to 1/2 turn. Attach your tubing and catch cup. Make sure you've got sufficient fluid inside the res. Give the brake lever a full squeeze, slow and firm, all the way to the bar. Then release, keeping an eye on your fluid level to make sure you don't run dry as you go. Repeat above as necessary. You should see movement in the fluid and a gradual reduction in not only the number of bubbles coming out the SB, but also in the size of them as well. If you've done things correctly, you should be pushing virtually unblemished, virgin DOT 4 through the lines and out the SB in very short order, just a number of pulls on the lever. You might need your husband, wife, S.O. or roomie here at the end, because I like to close the SB about mid-stroke on the brake lever just to make sure the line fluid is under pressure when the escape route is sealed off. (You can simply tighten the SB after your last pull of the lever and be okay, however. The internal check-valve is what prevents air getting into the system.) Now go over to the other side of the bike and repeat the final bleed process. Once you're done up front, you pretty much follow the same steps to replace, prime, and bleed the rear line. The final thing I like to do is use a nylon tie to hold back the front brake lever with the bike on its side stand and bars locked to the left. This places the master cylinder as high as you can get it. Take the plastic handle end of a screwdriver and gently rap the calipers, banjo bolts, and lines from top to bottom. By the next morning, any teeny-tiny bubbles which might have evaded your expert bleeding adventures should have, in theory, escaped up and into the res. You're all done! Go inside, shower up, and crack a beer. You've earned it! Note: you can do all this without Speedbleeders and a Mityvac, but the process changes a bit. I'd have to type up another walk-thru if that's the route you go, so I implore you to pony up the extra coin to get the SB's and pump! 😏 Ride well, all. Sarge
-
find more tips by Shane About Shane
-
-

0 comments
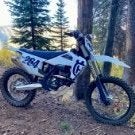
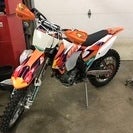
This bike works great! I purchased it in March 2016. It will be used for off-road racing and general play riding. Power comes on hard, right off the idle. Suspension is valved pretty close to where I would like it. Only a few clicks on the forks to make it work. The wide ratio transmission compliments the package well. I thought I would remove the kick stand but it works well and stays in place. -
0 comments
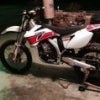
Fun play bike in the dirt. Heavy and suspension is very limited but the torquey motor is forgiving and a blast for casual riding. For SuperMoto track days or mini class racing, corner speed is your friend. The rear drum brake is also limited, and will permanently discolor under heavy use because of heat buildup, but mods can be done to help cool the hub. Even with the limitations, the 230 is a lot of fun, and, on a tight trail or kart track, can be surprisingly quick. -
-
0 comments
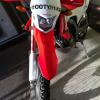
Typical Honda both the good and bad. Feels like a nice improvement over my previous '05 CRF250R -
2 comments
Thumbs up! -
1 comment
beautiful yet strong bike. -
2 comments
Really fun cross country/single track bike -
0 comments
So far so good! -
0 comments
Power,Speed,Grace and BEAUTY;)And she never talks back....or complains.......if only 2300.00 bucks could get a woman that great it would be a much happier world indeed :) -
-
Hello, Im installing some new stainless lines on my 2013 xr650L. At the moment I’m working on the rears. I bought the tusk lines from Rocky Mountain and they appear to be rebranded galfer lines. Right off the bat the rear line is shorter than the old stock one and it doesn’t really want to route in the same way. I’ve tried the line both ways and I can’t seem to find the position that feels natural. One side of the line has a slight kink in the fitting and the other fitting is more straight Does anyone know which side of the line should face the front of the bike?
-
Anyone know where I can purchase a rebuild kit for the rear brake caliber on a 1988 Kawasaki KX 125 F1 model? The dust boot seal on this one is finished, the piston is pitted in a few spots and the bleed nipple is clogged with dirt and rust. So far I have only found kits for 1989 G1 models onwards.
-
This looks intteresting.. not sure about how durable this thing is and what problems but the benefits I could use.. It looks a little funky though..maybe just have to get used to it..
-
Got hit by a guy in September. Part of the damage was the front brake line broke. Bought a new HEL steel braided brake line and am not getting shit for feedback. I have bled from, both master cylinder and caliper banjo bolts. The bleeder valve. I zip tied the brake lever for 24hrs. I even went and bought a mighty vac. Still not getting any significant pressure build up. Any tips, what am I doing wrong? Pump 5-15x. Hold. Crack bleeder. with mighty vac Build van pressure to 15psi, crack bleeder. Refil resivoir. Repeat pumping. Going insane.
-
Does anyone know how to remove the rear brake “piston/plunger” that drives the movement of fluid in the master cylinder? Trying to replace mine as the seals are bad but for the life of me I cannot get it out. It is not threaded, there is no c-clip, it won’t fall out the bottom no matter how much I tap the sides, and I’ve even tried blowing compressed air down into the small hole at the bottom of the cylinder to see if it would blow out and it still wouldn’t budge. It will slide up just like it’s supposed to but will not come out the bottom for removal. Anyone have any tips on how I can remove this? Bike is a 2014 KTM 350 XC-F Thanks in advance!!! Photo is of the bottom of the master cylinder.
-
I'm just about to order some HEL brakelines. They don't do a kit for the L, so I have a choice of sending the originals or they have a page on their website where you can specify what you want. So my question to the power of TT is.. What are the thread sizes in the master cylinder and caliper? Am I right in thinking that the length is 500mm to get rid of 'the loop' many thanks in advance 👍 ride safe
-

Front Brake Micro-Switch Lever Engagement
TipsyMcStagger posted a topic in 250-530 EXC-F/XCF-W/XCR-W
I just installed the OE front brake micro-switch on my 2014 XC-W. It's stock switch on the EXC and all of the front brake perch part numbers are common between the XC-W and EXC. As you can see in the picture, the brake lever comes nowhere near engaging the switch. Even with the lever adjusted fully away from the bar (which would be too far for me to reach comfortably), there is still air between the lever and the switch. Obviously, applying the front brake pulls the lever further from the switch. I know I can use a hydraulic banjo switch but I already bought this OE switch and I wonder if there's an adjustment I'm over looking? The picture below is the brake lever at rest. TIA. -
Killed my front rotor today on a rock garden. Dead, kaput, thanatos! For offroad use primarily and some dual sporting, what front rotor replacement would you recommend? Stock size or oversized @270mm? Solid or floating? EBC, Motomaster, Braking, any other? Power vs. durability vs. value for money? What say you fellow TT'ers? PS. Hurry up, I need to make my mind up soon, I 'll go ill if I don't ride next weekend!
-
I recently took my 2008 yz250 out and i was riding it, the front brake would just randomly stop working and it would have no resistance, and then i pull the lever 2-3 times and it goes back to normal, how can i fix it?
-
Should I be concerned about this little groove on the spring bracket of my rear brake pedal?
-
Hello guys, Y'all are always a big help to me with my problems and this is a really noob question, but here goes. I took apart the brake system to paint the bike, I then put it back on, but isnt bleeding. It doesnt even seem like fluid is entering the master. I took apart the master and the seels dont look too bad and there is no scoring. What should I do? I dont want to buy a vaccum kit or anything. I purchased a steel brake line but I am waiting to put it on. Could it be the line? I also purchased a rebuild kit, but itll be a while till it gets hear. Anything I should try, or any reasons y'all can think pf for why fluis isnt even entering the master cylinder? Thanks again, feel free to roast me for this question.