Search the Community
Showing results for tags 'Control'.
-
 Been trying to get a hold of these guys last few days but no luck. Website still up and phone number still works but no one home lol. Any one know if there still making them or? I read no bad reviews or nothing about no one breaking em so not sure what the deal is. Edit. Finally got a call back. They Just been busy, still selling bars. Im ordering mine wedsday.. fingers crossed, these bars better be sweeeet
 -

1 review
Replaceable stainless steel teeth give twice the grip without destroying your boots. You will feel more in control of the bike giving you the confidence to take your speed to the next level. Billet machined from a solid chunk of 7075 - T6 aluminum providing unsurpassed strength and durability. You will love these pegs - we guarantee it! Featuring: - Precision CNC Billet Machined for a perfect fit - Includes 5 extra stainless steel teeth - Wide 57mm platform x 86mm long - Self cleaning mud grooves - Ergonomically designed to reduce fatigue, increase grip - Stainless Steel springs included -
1 review
Comes with everything to sturdily mount both your handguards while sealing dirt and debris out of your throttle tube. Improve your throttle control by sealing out sand and dirt from your throttle tube when you run bark-busters or handguards. Eliminate the crunchy throttle on your dirtbike by running Tegradyne's Patent pending "Jimmy Hat" sealed throttle tube and threaded insert assembly. Installation is quick and easy. Just tap your handlebars, install the threaded inserts, put grips of your choice on, and install your choice of handguard, end-cap, or other bar-end accessory. The rubber seal is very low drag and still provides a crisp throttle action. The seal allows the user to add lubrication to the throttle tube as well. This results in even smoother action without the downside of attracting dust and dirt. Comes with both threaded handlebar ends, a 5/8-11 tap, a new sealed throttle tube, and 5 throttle cams. Threaded inserts fit most aluminum handlebars with the exception of steel or thin walled bars such as Renthal Twinwall. Threaded inserts are through tapped with M8-1.25 thread which is compatible with most handguards. Throttle cams fit most adult full-size dirt bikes including: Kawasaki KX250F/450F 2018-2004 Suzuki RM-Z 250/450 2018-2004 Yamaha WR250F/250R 2018-2001 YZ400/426F/450F 2018-2000 WR 400/426/450F 2018-2000 YZ 250F 2018-2001 Husqvarna FC250/350/450 2018-2016 KTM 350SX 2018-2012 KTM 400/450/520/525 SX/MXC/EXC/XC 2018-2000 KTM 450/525/625 SMC/SXC 2018-2003 Honda CRF 250R/250X 2018-2004 Honda CRF 450R/450X 2018-2002 Kawasaki KX 125/250 2012-2000 Suzuki RM 125/250 2012-2000 Yamaha YZ 125/250/250X 2018-2000 Gas Gas EC 125/200 2009-2000 Gas Gas EC 250/300 2012-2000 Gas Gas MC 250/300 2008-2000 Honda CR 125/250 2008-2000 Honda CR 500 2001-2000 Husqvarna TC 125/250/300 TE 300 2018-2014 KTM 85 SX/XC 125 SX 150 SX 2018-2000 KTM 200 SX/XC/EXC/XC-W 2016-2000 KTM 250 SX/XC/XC-W/EXC 2018-2000 KTM 300 SX/XC/XC-W/EXC 2018-2000 KTM 380SX 2012-2000 Yamaha YZ 250F/450F 2018-2014 Please inquire if you are unsure about fitment! Inserts are proudly made in the USA! #throttle #ThrottleKits #HandlebarsAccessories #Seals -
1 review
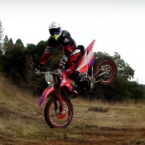
FLO MOTORSPORTS 3.0 Foot PEGS Rounded Edges Loctite on Cleats Extra Wide platform. KTM Footpeg Size is 57mm Wide and 86mm long. Stainless steel Flat teeth Removable Teeth (Cleats) with 5mm Hex Self Cleaning Mud Grooves. Foot pegs are possibly the most over looked parts on a bike but one of the most important parts. No matter how much power your bike makes, it means nothing if there is no control of the bike . You probably haven't given much consideration to you're footpegs before, but pretty much all professional AMA supercross , motorcross and off-road riders ride go with aftermarket footpegs for a wider platform, more grip and overall control of the bike . Our Pro series Flo Motorsports Foot pegs will offer all of the above . The foot pegs you are about to purchase are the same pegs used by Factory Supercross teams like Traders Racing (Yamaha) , BPR Home Depot ( Yamaha) and JMC Husquvarna. Our pegs are constructed from highly durable 7075 T6 alloy making them much more durable then some standard cheap 6061 T6 that many competitors use on the market. -

1 review
Ride Engineering is the first company to offer a way to mount the Showa steering stabilizer onto another brand. This MX style stabilizer was originally developed by Ricky Carmichael in his days as a factory Honda rider. Today you will find one behind the front number plate of many top level national pros (this includes Ryan Dungey). Many GNCC/Enduro/Desert riders are also switching from the typical "Desert style" steering dampener to this less restrictive, easily installed device. This simple bolt-on bracket kit is available for all KTMs complete with mounting instructions (Upper and lower brackets included). Showa damper sold separately. -
Renthal Gen2 Direct-fit IntelliLever Clutch Blade for Magura
LuizSNeto posted a product in Hydraulic Controls
1 review
Product Code: LV-120 Gen2 Direct-fit IntelliLever Clutch Blade Replaces OE Clutch Lever 50302031300 Not compatible with KTM OE Handguards -
1 review
This Zeta Racing throttle tube [Part # ZE45-5111] was purchased to replace the stock rubber grip on plastic tube of a 2016 DR-Z400SM. Its main features are that it is all aluminum, has minimal metal-on-metal contact with the handlebar, and reduces the twist distance for the throttle in between closed and wide open. It has a plug for those that want a closed end versus those that need an open end for brush guards or bar end mirrors. (You would need to buy appropriate grips or mod existing ones to suit.) Weight of Zeta Aluminum Tube with Spider SLR grip = 2.80 ounces (Stock plastic tube with Stock Grip = 2.20 ounces) New twist range reduced by about 1/4 from closed to WOT. (Zeta = ~60 deg. Stock = ~80 deg) Aluminum tube looks much beefier than stock. Would be much more likely to survive tip over or worse. Has a good knurled surface to bond with glued-on grip. I doubt any slippage will occur over time. Spins very freely on handlebar without binding. Does not add a lot of width over the standard throttle tube A quick turn throttle tube can be easier on the wrist (carpal tunnel) Installed into existing housing without issue and could tighten housing fully without binding cables. What I had problems with during installation were products of my novice mechanical aptitude, really. I slipped the grip on too far without measuring it first. It rubbed slightly against the housing. I did not push the grip on past the mark on the Zeta tube, but it was still too far. I should have measured twice and cut once. I did have to adjust the throttle play to get the throttle to snap back freely. I adjusted it both at the in-cable nut adjuster right by the front brake cylinder on my DRZ, and under the gas tank where the cables meet the carb. Note: I do have handlebar risers on my bike so the cable adjustment at the carb may have been due to changing the overall length needed for a smooth throttle return (snap back). Overall, it was pretty close to a bolt-on mod. I did have to spend time readjusting throttle free play to get a good, crisp throttle snap back. My Spider SLR grips fit nice and snug. Operation out on the street was fantastic. The Quick Turn or semi-Speed Throttle nature of the new throttle tube is great. My DRZ has the 3X3 airbox mod and rejetted carb and it responded superbly to the faster throttle. Not quite night and day, but a definite improvement with zero bogging. I don't view this as a "true" speed throttle as some of those have about a 1/4 total range between closed and WOT like the track guys like, however, the Zeta produces a very perceptible difference that I appreciate. Going from a stop rowing through the gears on the way to 70+ just seems quicker due to the reduced twisting motion at the throttle. As I am only at about 100 miles, I can't attest to the longevity. Keeping the thing clean will be important as even the minimal metal-on-metal contact with the handlebar can eventually get gummed up and bind the throttle action. Remember that the cable barrel heads are secure in the housing, so it is just the aluminum tube around the handlebar to be conscientious about. Running an open grip end without the supplied end cap or other bar end gizmo would probably facilitate crap getting between the throttle and handlebar (not to mention down into your handlebar). I would recommend and purchase again for a similar bike. Take the time to adjust your cables after instillation and you should be quite pleased from your stock setup. -
3 reviews
An Adventure Foot Peg with Proven Purpose. A larger platform with better peg traction & much improved comfort . The Impact Adventure Peg, Patent # US 6390488, accomplishes this by isolating the large cleat from touching metal to metal, resulting in the rider experiencing less vibration and abuse transferred to the foot. With the Impact Adventure Peg you'll have more leverage, while your foot stays better planted, resulting in your feet, ankles and knees feeling better. This adds up to a better day on the bike. How does it perform? Proofed out in the notoriously choppy, teeth chattering, West Rim in Southern Utah, a trail that is initially so harsh with slick rock ripples many find an alternate route to the “good stuff.” This was the perfect proving ground for the Impact Peg, as often riders feet vibrate or bounce off of the pegs from the continual chatter. With the Impact Moto Peg the harshness of the rocks was squelched, the riders feet stayed on the pegs, and brutality of the notorious chop tamed. Further the slick rock drops provided the perfect opportunity to test the how the Impact Moto Peg performed on massive impacts. Our test riders repeatedly launched big rocks to flat landings, noticing none of the sharp pain or sting shooting through their feet to their lower back as they would with any other peg. What is the Impact Moto Peg made out of? Both the cleat and the base are made out of 7075 T6 aluminum, providing the best structural integrity and wear resistance. The cleat is 112mm long by 60mm wide to provide a large platform with extra leverage often needed on large adventure bikes. 13 5mm Inserts are positioned for optimal traction and wear resistance. The base is shot peened and anodized, while the cleat is hard anodized for wear resistance. The cleat is isolated from touching metal to metal through our base elastomer on the bottom, and cup elastomers on top. 10.9 bolts secure the cleat to the base, making the Impact Moto Peg not only the best performing, but the strongest aluminum peg on the market. Models: Currently we only offer the Adventure Impact Pegs for KTM Adventure bikes, old chassis KTM/Husqvarnas (pre '16) and Husqvarna 701. We should have Adventure Pegs available for BMW, Triumph, the African Twin and Yamaha's Super Tenere shortly. Features Absorbs vibration and abuse. The elastomer absorbs vibration allowing your feet to remain better planted on the pegs. High-frequency abuse like spikes, jolts, and bumps are also dramatically reduced through the cushion of the elastomer. Exceptional traction A combination of our tooth profile coupled with minimized vibration, and larger platform (112mm x 60mm,) literally grabs hold of the bottom of your boot. Hard Anodized 7075 T6 Aluminum Provides exceptional construction, strength and wear resistance. Down and back. The KTM Impact Adventure Peg is a 1/2" down and back to open ergos, providing more room on the bike. -
3 reviews
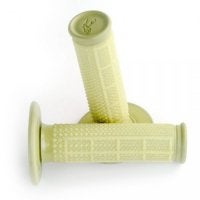
DETAILS Renthal half-waffle dual-compound Kevlar grips are among the best MX grips on the market. Renthal has developed a special compound for its grips using Kevlar. As a result, the grips are extra-strong, able to withstand significantly more wear than Renthal's other grips without sacrificing comfort or control. Another great feature of these Renthal Kevlar grips is the half-waffle design. The half-waffle construction is prevalent among MX grips because it caters to both comfort (smooth on the palms) and control (waffle on the fingers). Renthal has developed a special Kevlar reinforced grip, with all the properties you would expect from a Renthal grip along with the added life-extending properties of Kevlar. The grip's base material is reinforced with millions of randomly aligned Kevlar fibers. As the grip is used, more Kevlar fibers are exposed, so the percentage of Kevlar at the grip surface increases. The grip's Kevlar layer offers three times the life of the regular compound, which allows Renthal to use a very supple matrix material. This revolutionary material lasts three times as long as Renthal's regular soft material. These Renthal grips are for use with twist throttles. If you use glue on the installation of Renthal grips, due to the specific compound, only Renthal grip glue will work. -
1 review
GENERAL DESCRIPTION The stock brake pedal on the Honda CRF250L is non-folding, which makes it prone to damage in a crash. DRC now produces a folding rear brake pedal for the CRF250L which is a direct bolt-on replacement for the stock pedal. It also looks very trick on the bike in Black with a Red folding tip. STANDARD FEATURES Durable forged construction Black brake pedal body Anodized Red Folding Tip Ultra grippy teeth on pedal platform Includes tether to attach to bikes frame -
1 review
DETAILS The Tusk aluminum brake pedal uses an extremely tough forged aluminum arm with a CNC machined toe tip to make this brake pedal one of the strongest you can buy for your motorcycle. The CNC machined tip is spring-loaded and rotates to prevent damage from crashes and impacts. The CNC tip also features stainless steel cleats for maximum traction; it is also replaceable in a variety of colors. The Tusk brake pedal also includes an adjustable length brake saver cable and mounting bracket to help prevent damage from brush, rocks, etc. Stock replacement motorcycle brake pedal; engineered to meet the demands of motocross and off-road racing. Pedal arm is made from forged, anodized aluminum; the tip is made from CNC machined billet aluminum. Rotating CNC toe tip prevents damage from crashes and impacts. Tip also features stainless steel cleats and is replaceable in a variety of anodized colors. Adjustable length brake saver cable and mounting bracket also included. -
1 review
PRODUCT DESCRIPTION Universal fit for any bike and any size. Brackets feature rotating perches to move instead of breaking. Mounts to bars, not lever perches for better positioning. Vented design allows airflow without sacrificing coverage. Keeps hands warmer in inclement weather. Protects hands against flying roost and debris. Rotating mount design positions the guard where you want it. -
2 reviews
SPECIFICATIONS Two-piece handlebar clamp kit developed for easy installation of over-sized bars ( 1 1 / 8" ) to stock rubber-mounted top clamp. Specially designed bolts enable three different back and forth positions ( stock , stock + / - 4 mm ) Available for CR, CRF, KX, KXF and WR250R / X . The height is not adjustable. # WR250R / X clamp is 10mm higher than stock bar position. -
1 review
DESCRIPTION Super strong. Using hand-fabricated, aerospace-grade titanium and the latest manufacturing techniques to produce the strongest welds, eliminating stress and corrosion. Ultra light-weight, only 410g per set. Maximum grip 24 tooth design, 3 Rows of teeth on a wider platform (57mm) offering a greater surface area. Anti-clog design to resist mud clogging and buildup. Hand-fabricated in the UK. All Raptor Titanium footpegs are supplied with compatible stainless steel springs. Extra springs can be obtained from our accessories page. -
0 comments
-
-
0 comments
-
-
0 comments
After 7 years on 300cc two strokes, at first the little 150 felt underpowered…….but the more I ride it the more I’m starting to gel with it. The weight and/or reciprocating mass is most noticeable. It turns and stops so much better than my KTM300. The weight is also noticeable on those long loose rocky downhills, I seem to be able to carry far more speed on the 150 as well as be able to change lines more easily. -
I recently did my first set of steering stem bearings this last weekend. IT WAS HARD, especially to get the races out. Here is a mock up of a cut away steering stem if you were looking at it fron the front of the bike: I researched every old thread on TT and most said to do the brass punch way: (you hammer at the punch on the lip of the race, all of the way around, til it gives way) But after about 3-4hrs of trying this I was sick of the punch slipping off the race, I tried cutting the race off with a dremil but that just caused frustration and it was highly likely that i would score the inside of the head tube. The other way i found on here that would most likely work, but i did not get the oppertunity to try was running a ARC, MIG or TIG bead along the face of the old race and it will supposedly drop out when the weld cools because of the contraction when the weld cools down. NONE OF THESE WORKED FOR ME! So i set out to develop my own method which i have not seen on TT yet: You will need: >Steel pipe (1-1.5ft in length) (needs to fit inside of your head tube with about an 1/8" play on either side, does not need to be exact at all) >Metal punch, chisel or tapered piece of metal (i prefer a chisel) >Hammer >Penetrating fluid (optional, helps though) THIS WILL ONLY WORK IF YOU HAVE AT LEAST A SMALL LIP!! DONT TRY UNLESS YOU CAN FEEL AT LEASET A TINY BIT OF A LIP!! 90% of bikes do have a lip. Spray Penetrating Fluid around the part of the race that contacts the stem. Insert the pipe so that about the same amount is sticking out on either side of the end of the head tube. Move pipe over to one side of head tube. Jam chisel or tapered metal next to pipe and hammer in so it is VERY snug. Hammer oposite side of pipe and it should drive right out!! Heres a pic to demonstrate: This took me less than 5 minutes to do both, just repeat the other way for the top race, a very easy process.
-
A lot of people loosen the brackets that attach your clutch or brake assembly to the handle bar, so in case of an accident the assembly will spin rather than break. But its difficult to get the right tension and the friction factor changes with water, mud, etc. which can cause the assembly to work its way loose and move while riding. I find the best idea is to wrap Teflon tape (plumbers tape) around the handle bar where the the clutch and brake assembly will be mounted. The Teflon is frictionless, so you can still tighten your clamps firm but it allows the assembly to spin with force in the event of a crash, but not rattle loose while riding.
-
I am the King of Dirt...Cheap, so here's some tips that are fresh on my mind tonight: #1---To prevent levers from breaking, unmount your perches, wrap plumbing teflon tape around the bar, then remount. Works unbelieveably well. #2---Many bearings/seals/etc are interchangeable among all the Japanese bikes; however, for some unknown reason, Suzuki will sell them considerably cheaper. Even better, most American machine shops now carry NTI bearings now, which are Japanese and often the same maker as your bike's bearing/seal. In this case, carry the old one with you and buy the parts guy a Coke, and he will look up a cross-reference/match for you. If he finds one--likely--it will be either cheaper or MUCH cheaper. He will have different grades/strengths, and if he is savvy, all you will have to do is hand him the old one and explain the bearings particluar use/job application. #3---The auto world has considerable stuff that we can use, from hard parts to soft parts to very trick tool ideas (that you can subsequently make yourself.) I regulary make my own non-critical paper gaskets from Felpro gasket stock; once you mike the thickness/es that you need, then go buy this stuff by the sheet at a FRACTION of the bike price. There are several methods to "drawing" the gasket shape, but the easiest for me is to smear a film of grease on the part's edge, lay it face down on the gasket-sheet, and voila---you know can take your scribe and cut it out. es, Herman, you do want the gasket to have grease rubbed inot it on both sides to allow you to remove it w/o tearing it next time. No, it will not leak, unless you have irregular surfaces. I do use yamabond/three-bond for magneto covers... Yes, posterboard makes pretty darn good gasket too, or your kids' construction paper, but Felpro is def best. #4---Pipe-to-head junctions: Auto parts stores will have sheets of "high temp gasket material". This is not dirt cheap, but much cheaper than buying it in liquid form, and a heck of a lot easier to work with, and reusable to boot! Cut out a doughnut of it and sandwich it inbetween the pipe and jug. (You may spray it liberally with silicon spray to help ease the pipe in, but you already knew the value of that stuff for air boots/etc anyway, I am sure.) #5---Shimming an old bike with bronze shims can add many hours of life to it, not to mention tightening up the old bird. The se can also be had at an auto machine shop; you may buy them by the handful or by the set/kit (even cheaper.) Buy a metric kit if thay offer it, and it will be loaded with different ID/OD?thicknesses of bronze shims. #6--If you are loop-out prone, remove the two lowest rear-fender bolts' washers. I am from the old school that still belives that a slow, controlled wheelie is a danged nice trick, so...This allows the fender to get ripped off w/o ripping it up, as these two will just pull thru. I even go so far as to cut out the upper mounting holes on their 7 o'clock thru 5 o'clock positions. A nickel-sized automobile fender-washer ensures proper grab, yet the fender will pull off once the tire grabs ahold of it... #7--That Plastic-renue product does indeed work pretty darn well; tho I prefer to jsut work some overtime and then just go buy a fender instead, usually, as I am not fond of sanding. #8--Radiators/Pump seals!!: do not use antifreeze containing silica, ie, SAND! The sand does indeed keep everythign scrubbed clean, but also scrubs your seals, too! Japanese auto makers do not put this stuff in their cars, as they understand that if a person uses ONLY distilled water in their system, and then annually changes the fluid, there will BE no "buildup". Once again, you can buy this silica-free coolant at auto stores and it is MUCH cheaper than a japanese dealer, auto or otherwise. #9--The biggest tip I know: Go to your local AMA Qualifier race, and you will find perfectly good plastic/tires/etc being thrown in the trash barrels. Most of these guys have heavy sponsors and so change their tires after two motos, bars after one crash/tweak, etc, etc. They will even throw away 75% good brake pads if it is a mud race, b/c they dont want to get stuck with overheating/thin pads in the next moto. They are also a wealth of inside info about your particular bike, when you pick a "with it" rider/team. Even if it is a few years old, they usually remember what the did to set it up. Their knowledge can save you a bunch of heartache. #10--Tire changes: Did you know that there was once an American ISDE team that could change rear tires using NO tools but their hands?? And inside of 9 minutes at that. They said their main key is to keep the tire's 12 o'clock beads in the CENTER (ie, the deepest) part of the rim. (Since the trough's circumference is much smaller than the tire's, you have instant slack created.) This allows you to pull it toward you further, creating a much larger gap for the 6 o'clock beads, so you can get it over the rim's edge. I go so far as to put 2 small C-clamps on the tire at 10 and 2 o'clock, enabling me to keep the tire in the rim's deep trough. I def use dishwashing soap on the tier, and even leave it out in our nice 100-degree sun for an hour to soften up, too. Also, use rim protectors to keep from marring up your rims. They are plastic, clip-on covers aobut 3 inches long,Auto tire shops use them for nice aluminum wheels as well (cheaper to get from them.) #11---Acrylic home floor wax makes a fine bike-shine, as does plain old silicon spray to a lesser degree. The floor wax must be applied with a sponge, and in one direction, else you will see lines in it once it dries. Once you wash your bike it comes off, but will def take Simple Green/etc to get off. #12---If you will spend $60 for a Karcher electric power washer, and then NEVER run it longer than 1~2 secs w/o spraying, it will last forever as a fantastic bike washer. (If you do not keep water running thru the pump, ie, keep spraying, the little pump gets too hot, causing it to fail prematurely. This is about its only flaw.) Oh yeah, most home hot water heaters have a readily accessible drain valve, already threaded to accept a water hose! Imagine that... And we all know that hot water evaporates much much faster than cold, thereby preventing a lot of potential problems associated with water retention in various places...see also #18 below. #13---If you do not have the cash, buy an old-fashined, QUALITY, broom. This and a 5gal bucket of hot soapy Dawn will do literally almost as well. Hang the broom when done of course, or it will dry in a bent form. #14---Auto Wrecking yards and scrap metal yards frequently have dirt bikes/skeletons in them. I have gotten some fantastic winter projects for peanuts this way. Sadly people get divorces a lot nowadays, and when they move, many times the bike that they inteded to fix up for umpteen years suddenly is a problem: do they store it or just get rid of it? Those free want-ad papers are ripe with deals as well, for this very same reason... #15---Take your electrical connections apart while they are still clean and apply some dielectric grease to them. Years down the road you will be very very glad; Japanese electrics still basically stink after all these years, so dont weaken an already marginal flow with corrosion/poor contact. #16-- Needle bearings/bushings: I know we should all grease our linkages every time we wahs our bikes, etc. But since we barley have time to ride, I assemble mine with automotive engine assembly lube, which is very high in moly and graphite. This means that after many abusive rides and washings, there is usually still some forme of lubrication in there, though thick and pasty it may be. No, you will not feel any difference in your shock linkage's action; if you think that you do, then you need to just go a tad faster, Mr. Spode. #17---...here's another that I forgot, especially if the bike is new/been 100% cleaned up: I also remove the throttle assembly, remove all liquid lube from the inside of tube and bar w/contact cleaner, and lube w/locksmith's powdered graphite; ESPECIALLY if running handguards where the throttle-end grip has been cut out (to avoid retaining grit). #18---And one more: Never will a bike be as clean as it is new, so I take this chance to go ahead now and mark crucial-but-seldom-removed bolts/nuts w/a paint pen to facilitate confirming them visually, and remove the tank and spray the elec parts/connections w/aerosol di-electric protectant. (And spraying the rest of the bike under the tank/area w/aerosol silicon or WD40 will go a long way in making it easy to clean with just a spray hose and no scrubbing once its coated w/dried mud.) #19---...and one more, for all you tall guys (and gals): TO raise your bars w/o having to spend a lot of ca$h, proceed to your local friendly bike salvage yard, find a couple bar clamp "caps" that match/align with the ones currently on your bike already. First, as with all clamps and caps, take a rat tail file and grind off any sharp edges, to prevent them from cutting into/weakening your aluminum handlebars over time. Now take off your bars, place this 2nd set of clamp-caps upside down beneath your handlebars, but on top of your existing bar-clamp. Now put your existing clamp-caps on top of that. Buy some new, longer clamp bolts to make up for the added thickness of the added clamp-caps, and "voila", your bars are now the same familiar bend but ~1/2" higher, and wa-a-ay more comfortable while standing! If they are too high, grind them thinner and retry. I do this to all my bikes that don't have aftermarket clamps/high bars, as I am 6'2" and also suffer from bone spurs in my neck, so bending over while looking up is darn painful, not to mention slower...ttfn. #20---And yet another: there is no comparison to using S2000 / aka Honda's bike wash, but a pleasantly suprising 2nd place is Mr.Clean. This is what Carmichael's Kawasaki mech showed me at a Dallas SX in '98, and he is right, as long as you rinse it well as with all effective cleaners...I am a big fan of Simple Green, but Mr.Clean seems a tad stronger. Once the bike is clean, buy a QUALITY spray bottle from your local friendly janitorial/auto detailing supply store for about $3, fill it from a gallon jug of WD40, and proceed to spray the bike all over, sans bars y seat. Spray even under the tank and belly. (You must use a quality spray bottle, as no other spray bottle will spray a fine enough mist, ruining the whole trick.) Now, towel dry the plastic if u so desire, and you will be amazed at this stuff's effectiveness at both protecting everything and repelling stains (we have red clay here). Your bike will be stain-free after years of this practice. A gallon of WD40 will last years. There you go, have a factory-clean scoot for pennies on the dollar. Honda's silicon spray bike-detailer is great stuff for detailing/shining, but I rarely use it when I have already wiped the plastic down w/WD40, unless the plastic is white, in which case I have found no equal cleaner for getting dirt out of scratches w/o damaging the plastic.
-
Last year I had some bad luck as I was working on my bike and found a broken throttle cable. Yamaha wanted like $40 for a new set, (and didn't have them in stock anyway) and I wanted to save the ride that day, sooooo, here goes. NOTE: I own a MIG welder, so this was easy. I went to the hardware store and found some round steel rod of approximately the same size as the end that came off my cable. The I took a 4" angle grinder with cutoff wheel and cut a slot for the cable to slide into. Taking the MIG, I grounded the rod, and set the heat and feed down slightly from a thin metal setting. I tacked the end of the cable first, check the position and then hit it again in the slot. Then I smoothed off the weld with the cut off wheel and cut the rod off at the appropriate length to fit the throttle wheel on the carb. All I had to do then was adjust the slack to install the cable and I was done. That was last year and the cable is still working fine. Since then, I've also been able to repair clutch cables in the same manner. AND... I've found a source for new inner cables: http://www.jagwireusa.com/index.php/products/mountain/499 My local mountain bikes store carries these and for less than $5.00 I can get a new inner cable and simply weld on a new end once cut to length. It's a great way to save money in these tight times!! Ride hard, reduce your cholesterol 30 points !!!
-
I've had a few throttle cables break over the years. With the exception of being in a really technical area it's easy to get back to camp with a broken cable. Just idle up the motor to a desired rpm and use the kill button for corners.
-
0 comments