Search the Community
Showing results for tags 'Cylinder'.
-
Hi everyone, hoping for a little guidance. So I recently picked up a brand new "A" cylinder for my 2003 CR250. When I sent to order the piston, the OEM is not available in "A" or "B". Wanted to go with a vertex or maybe pro-X , but I only see ones they label as B available. If it was a used cylinder I wouldn't be concerned. Being brand new and no wear in it , I want to make sure I get the right piston. Any thoughts on what I should do? Thanks in advance! Also according to Honda OEM manual, it actually seems to look like the "B" piston is smaller.
-
 Proper engine break-in is equally as important as a proper rebuild. Here, we'll go over a checklist to make your build will last, as well as a step-by-step break-in process. Putting in the time and money to rebuild your motorcycle engine is both a critical job and a prideful accomplishment. The feeling of an engine failure right after a rebuild is a sinking one, and will most likely stir up a mixture of frustration and disappointment. We want to help as many people as we can avoid that feeling. So, we've put together a review checklist for your rebuild, followed by a general engine break-in procedure, because your motorcycle should bring joy and fun to your life, not take tufts of hair out of your head. We'll start with a quick review on the motorcycle top end rebuild. Be sure these critical steps and precautions have been taken. If you find any concerning discrepancies, it's worth it to pull back apart and double check. Be sure that you have proper piston to cylinder clearance. Recently, a cylinder was bored with requested .0035” clearance. This machine shop has been in the area for over 30 years. When complete, it looked like it was tighter. He slipped the piston through the cylinder a few times and said, "It's okay." He was asked to check again, which he refused, and said that it was correct, and that he was too busy. Back in the Brew Bikes shop, it was double-checked, and clearance was .0015”. Yes, way too tight. Don’t just take someone’s word that clearance is correct, always double check it! Always double check your piston-to-wall clearance. Was the honing of the cylinder properly done? Honing is required to be done after boring, and if the cylinder was not bored, it still is needed to deglaze the cylinder for proper ring break-in. Different honing tools are better used for different applications, with common tools being brush hones and flex hones. Safe grits and hone materials depend on the cylinder finish, so check your manual or with the cylinder shop for a recommendation. Be sure that the crosshatch is at 45 degrees. The proper crosshatch will retain the proper amount of lubricating oil while allowing the rings and piston to break-in. Too little of crosshatch or too much will not allow the rings to break-in correctly and never get the proper sealing they were designed for. Read our full guide to cylinder prep. After proper honing and deglazing, your cylinder wall should have a consistent, 45 degree crosshatch. If the bike is a 2 stroke don’t forget to chamfer the ports. If it has a bridge in the exhaust port, most pistons require this area to be relieved. READ the piston specs, and if you don’t understand, be sure to reach out to Wiseco for specifications. Read our guide to relieving the exhaust bridge in 2-stroke cylinders. A critical step in 2-stroke cylinder prep is port edge relief and exhaust bridge relief. This will help ensure smooth piston and ring operation, and combat accelerated ring wear. Be certain that the ring gap is within specification. Don’t assume it is correct, check it. Always double check your ring end gap. With your compression ring in the cylinder, measure the end gap with a feeler gauge to ensure it's within the spec included in your piston instructions. Proper cleaning of the cylinder. Before you start cleaning make sure the gasket areas are clean with no residue of gasket or sealers. First, use a cleaning solvent with a brush and then again with a rag. This is not enough, and you will need to clean with dish soap and water. Using a clean rag you will be amazed on how much grit from the honing is still in the cylinder. Be sure to clean the piston also. Thoroughly cleaning your cylinder for a rebuild is critical. Be sure all old gasket material is removed, and use a 2-step cleaning process of solvent with a brush and rag, followed by soap and water. When the cylinder is clean and dry, you should be able to wipe the cylinder wall with a clean rag and not see any honing material residue. Then before assembly, use plenty of assembly lube on the cylinder and the piston. Don’t forget to lube the piston pin and bearing along with the rings. Assembly lube on the piston, rings, cylinder, pin, and bearing is important for proper break-in. Many rings have a topside for proper sealing. Double check this and be sure the proper ring is on the proper landing on the piston. Again, read the instructions that came with the piston. Piston ring markings vary, but the marking should always face up when installed on the piston. The gaskets and quality play an important part of engine rebuilding. If a gasket is thicker than the original, it could result in a loss of power. Worse yet, a gasket thinner than the original will result in less deck height (piston to head clearance). This reduced clearance may result the piston to come in contact of the head causing permanent damage. After placing the gaskets, be sure while assembling the piston in the cylinder that the ring gaps are in proper placement. Check your engine manual for proper placement of the piston gaps. Then, install the head. Many motorcycle manufacturers have a desired head nut tightening sequence. Refer to their procedures while doing this. Most companies give the head nut torque rating with the washers, nuts and studs being clean and dry. That means if you use oil or a thread locking compound the studs will be over-stressed due to the over-tightening of the head nuts. Engines have been damaged by this. Now you know, follow what the engine manufacturer recommends! Regardless of the type of motorcycle engine you're working on, there should be a tightening sequence and torque spec for the head nuts. Pay close attention to the specs in the manual, as these are critical to prevent damage and for proper operation. Use the proper engine oil and fill to the proper level. The fuel you use should be fresh and of the proper octane. If your engine is a 2 stroke, mix to the proper fuel/oil ratio. For just about any 2-stroke, whether vintage or a newer, a 32:1 fuel/oil mixture is very common, but check your manual for the recommended ratio. Not only is it important for piston lubrication, but also for the crank bearings and seals. After all this work has been done, and you feel confident with the rebuild, what else can go wrong? PROPER ENGINE BREAK-IN! So many mistakes can happen while breaking in the piston and rings, resulting in rings never properly sealing or/and piston galling. Many builders have their own procedures, but most all do heat cycling for breaking in engines. Before we get into it, please note that this is just one of many methods that work well for engine break-in. Many people have many different effective methods, this is just one example that has worked well for us. Use this break-in procedure as a guideline for your next fresh top end: It's important to ask yourself if the rebuilt engine is still using the same carburetor, air cleaner, exhaust system, cam, compression, or if a 2-stroke, the same port work configuration? Any changes can result in air/fuel mixtures to be either too rich or too lean, resulting in engine damage. If your engine is fuel injected and in good working order, the ECU and O2 sensor should keep the air/fuel mixture correct. If you have access to an air/fuel meter, or if a 2-stroke, an EGT (Exhaust Gas Temperature) gauge, check the air/fuel mixture. Even with these tools, spark plug readings are still recommended. Spark plug readings are a sure-fire way of knowing if your engine is running too lean or too rich. We'll get into more detail in a later article, but generally the plug will look white when it's too lean, and dark brown or black and wet when too rich. At first start up, keep the engine just above idle and give it a few revs up and down. This power on and power off RPM breaks in the piston and rings evenly on the intake and exhaust sides. If air cooled, once the engine builds up heat where it becomes too hot to touch, shut the engine off. If water-cooled, once the engine coolant starts rising in temperature, shut the engine off. This initial warm up takes just a couple minutes. Now wait a few minutes until the engine is slightly warm to the touch, repeat #2, letting the engine get slightly hotter. Be sure to keep the engine RPMs above normal idle and keep the RPMs going up and down slowly. Let it cool again till it is slightly warm to the touch. This time, start and run longer until the engine gets near operating temperature. If air cooled, be sure you have a fan pushing air from the front. You now can rev the RPMs up a little higher, being sure not to hold it at a sustained RPM, but revving it up and down. Let the engine cool completely. Check all fluid levels to be sure there is no loss of engine lubricant, or, if water-cooled, engine coolant. After engine is cool, do a plug reading to be sure it is not running lean. Because the engine has run a few heat cycles, the gaskets may have compressed. It is VERY IMPORTANT to be sure engine is totally cooled down, and then check the torque of the cylinder head nuts. Most times the cycling head nuts will need some re-tightening. DON’T over-tighten; just tighten to manufacturers’ specification as you did when assembling the engine. Next, warm up the engine for a couple minutes as you did in the other procedures. Ride the bike, revving the engine up to normal riding RPM. Be sure NOT to keep the RPM too low and don’t lug the engine. These low RPM’s actually puts much more stress on the engine parts. If this is a dirt bike, running on a track is best due to the up and down RPMs the engine will experience. Don’t be afraid to run it normally. If this is a road bike, a curvy road is best due to the RPMs going up and down, this is a must! Don’t lug the engine and don’t go on an open highway that keeps the engine at a sustained RPM. This first initial ride will only be about 5 minutes. Let the engine cool till you can touch the engine. Follow the same procedure as above, but this time running for 10 minutes. This will be your last break-in run. Follow the above procedure and run for 15 minutes. Now is the time to let the engine totally cool down again. Check the fluids as you did before after the engine has completely cooled down, and do another spark plug reading. It is now time to do another check of the cylinder head nuts for proper torque. Sometimes no additional tightening is needed, but don’t be alarmed if you need to, because this is normal Check all your fluids once more after the engine cools, inclduing coolant and oil level. At this time, the rings and piston should be broken in. Go out and ride it. The first few times, just be sure not to get the engine overheated, but your ride times are not restricted. It never hurts to do another spark plug reading and double-check the head nuts after your first long ride. Enjoy your rides, and be safe!
- 15 comments
-
- 28
-

-

-
Hi all, I am finally trying to get back to working on my 03 Honda CR250. I bought a brand new OEM cylinder, and new OEM gaskets. Also installed new reeds. The reed block gasket, exhaust gasket, and cylinder base gasket were all leaking when I did an air test. I got my torque specs from the OEM Honda manual and I used a torque wrench on everything, and even rechecked with my old torque wrench when I seen all the leaks. Never had one this bad. So I used yamabond on reed block gasket, and permatex high temp on exhaust and they are good, so just to try I added another 5 foot pounds of torque to the cylinder studs and it slowed down but still two small spots where soapy water is bubbling. Its not even enough to make the gauge move, but I still know uts not right. Any suggestions on whats going on? Did I get a bad head, or bad gaskets? Or is the new head just not making up right with my old stuff? Also any suggestions on what to do? Should I lift the base up and try to use actual gasket sealer(not gasket maker) to seal the current gasket, or replace the gasket with new OEM paper, or I happen to have a new gasket from an 05-07, should I try that? And no I did not use screw drivers or pry bars to separate things, I used a rubber dead blow only when needed. I made sure I cleaned all the surfaces well with brake clean several times before installing gaskets. Also the only thing that didn't leak so far was the head gasket, but I didn't like the way the top of the jug looked from the factory so I planed it and my head on a piece of glass before installing the new studs and they seem fine. Just hoping for any thoughts from some other people. I would like some other input. Thanks in advance
-
Anyone have any doubts with this cylinder, you can see some tarnish but can't feel anything with your finger nail, it was lightly honed! Would you run it?
-
Can I get away with a hone out and replacing the rings? I have a other valve cover with freshly lapped and replaced exhaust valves 96 xr600r
-
Hi all, I am needing some help with my 2003 yz250, i have posted a thread up a couple weeks ago about my bike bogging and having no power. I've listened to everyone's opinions on what is going on and have tried to fix it. Now, i'm needing some help with the cylinder and head, jets, and the power valve. 1. I am going to replace the reeds with power reeds, Will i have to rejet or anything? or can i just throw them in and ride? I'm doing a fresh top end so want the bike to be running good when i first start it. 2. I bought new jets cause the old ones were blocked. The new ones are the same size as the old ones, i can just throw them in and the bike will run the same as if the old ones were still in? or will i need to mess around with something? 3. Is the cylinder head in good shape or bad? Is the cylinder in bad shape? If so, what is the cheapest way for now and for future rebuilds to fix it? What type of cylinder is it? Sleeved?, nikasil? 4. The power valve looks like it has alot of oil/carbon in there, how do i clean it and what do i clean it with? As seen in video, when i pull the power valve to me it stays like that, i thought it is supposed to go back in?
-
I can not feel with finger nail, but should I try sanding out a little better?
-
 2018 purchased with 40-53 hours on the stock motor, pistons, vavles, shims, transmission, everything; besides an aftermarket yoshimura slip on exhaust. Checked the vavle clearance before I road it and they were all in spec with suzuki's service manual. Let's move on. The bike was primary used for I dont know what. The last owner said he did some riding in the Oregon sand dunes. No idea if it was raced before that. My goal was to turn it into a road legal dual sport. I opted for a 2012 RMZ because they come with a dignostic port behind the front number plate mounted on the ECU that when kicked over provides a constant voltage of 13.50V to 14.50V ish. To power all the road legal stuff. Upon completion I replaced the hour meter with a Trail Tech Endurance 2 at 0 miles and 0 hours. Other then a stainless steel oil filter, changed spark plug, and cleaned air filter the engine remained stock. I commuted with the bike to work daily which is 3 miles there and 3 back on 40 mph roads. During lunch i ride for one hour about 15-20 miles on some wood trails. Blah blah blah. Fast forward some more and the bike has 90 accumalated hours total. I have not check the vavle clearance since getting the bike. Most of the riding was around 45-55 mph average for top speed to 35 everywhere else. My oil changes have been every 10 hours give or take how hard and how many miles I've driven. Changed with full synthetic maxima pro plus 10w40 oil. Air filter was cleaned once in between, from the time I got the bike till 90 hours........ lay it on me but wait till you finish this read. Okay so up to this time I'll reiterate that the engine is still stock. No top end rebuilts, no vavle shims, NOTHING! All OEM. At 90 hours I changed the gearing from the stock 13/49 to 15/49 since then I've added 15 hours on it with the same riding habits as before with my longest highway/freeway trip being 30 minutes at 18 miles mostly highway miles driven at or around 65Mph. Yeah she was screaming at that too, with a 5 speed gear box. It was sketchy even with that changed gearing. Blah blah again. Now I'm at 110 hours and 1500 miles on a still stock motor besides transmission gearing. My vavle spacing hasn't changed. And I decided to tear down the top end to see what I'm working with. Cylinder, piston, rings, conrod, vavles, spark plug, head, etc look okay with normal wear and tear. So in conclusion. I will order a forged piston to deal better with the higher rpms that I run at. BUT THAT AS FAR AS ENGINE MODS WILL BE IT. I haven't notice any power losses and love that gearing. It still works well down low. Now take it or leave it but this is an honest tracker from my level of riding and mechanicle knowledge. I'm not getting paid for this or influenced by a company or brand. I'm just posting this because there is, in my opinion no real knowledge posted about this topic but a lot of people are curious. Thanks.
- 26 replies
-
- 6
-
-
- Streetlegal
- Roadlegal
- (and 26 more)
-
Hi all, I've recently purchased a kx80 for my son's first geared bike, was told it's a 1994 but the frame number turns out to be a 1998 I think, after 1 hour of riding it started spitting water out the over flow and leaking from the cylinder head, upon inspection after taking off the head, the previous owner has wedged screwdrivers between them to split and has botched the bike together, now the top of the barrel and head is absolutely knackered. The engine is a 1989 4 stud top end, could i possibly change it to a newer 5 stud top end and would I need to change anything else with it. Thanks in advance. Bristol, UK
-
Hi, I stupidly assumed the clutch line takes mineral oil, and I flushed the system with it instead of DOT brake fluid. Went for a a couple of rides and now the clutch has no pressure and the master cylinder rubber inner cap is all deformed. It appears that the mineral oil ate up the seals. Anyone knows where to get just those seals? without needing to buy the entire rebuild kit? Any advice on rebuilding is also highly appreciated. Thanks
-
I was thinking about investing in a quality set of gauges to measure cylinders and pistons. I see harbor freight has some, but would like something a little better (and probably more accurate). Any suggestions on a specific brand or location to pick up a set? I'm not doing any high precision stuff, just checking my cylinder when rebuilding the top end every season. So I'm not looking for anything really expensive or something that will get a ton of use. Pretty much just once or twice a year.
-
Hi all. The other day while I was riding I blew a head gasket in my yz125. Decided to have a look at my piston while I had the top end apart to replace the gasket and found pretty deep scoring on the piston, as well as corresponding scoring on the cylinder and a chip in the nikasil. This happened 20 hours after I put a brand new oem cylinder and vertex piston in the bike. I have a new cylinder and piston on the way but I’ve just got a couple questions to help prevent this in the future. 1. Could this damage have been caused by the blown head gasket? If not what could have caused it? I always make sure my filter is clean, but could something have got into the intake to cause the damage? I was riding in sand when I blew the head gasket. 2. Other than the scoring, does the piston look to be in good shape after 20 hours? It almost looks like it is in too good of shape for the amount of time I was running it for as there is barely any wear apart from the scoring and there is no carbon buildup. Does this mean it is running lean? This is going to be the second time I’ve had to replace the top end due to damage the the cylinder, so I really want to avoid it happening again. Also I run 32:1 with fully synthetic oil. let me know if you need anymore information or pictures. thanks, Cameron
-
Hi everyone, my bike would not start after some investigation/inspection I have noticed there is a crack near the head gasket o ring, where the water transport are, I don't know what to do. Do I have to buy a new cylinder or can this be sent off and be fixed? I'm hoping it can be welded I've only just bought the bike ? it's like one thing after another. Your help would be appreciated thank you
-
 Rebuilding a top end is a task most two-stroke owners will run into at one point or another. Here, we go over critical steps and key tips to installing a new piston and ring(s) in your two-stroke. Periodically, if you own a two-stroke, there will come a point where you need to rebuild the top end of your engine. Hopefully, this won’t come as a surprise to you and will be part of your planned maintenance schedule versus experiencing an unplanned engine failure. While two-stroke engines are relatively simple mechanical devices, rebuilding them requires knowledge of how they work, attention to detail, and a systematic approach. We’re going to cover numerous tips pertinent to two-stroke top end rebuilds. These tips will be discussed chronologically and will encompass all phases of the build from pre-rebuild prep, to disassembly, through post build. The tips we’re going to share shouldn’t be considered inclusive of everything that has to be done, but are tips that focus on things that are either often overlooked or incredibly important. Let’s get started! Pre-Teardown Diagnosis - Before tearing the engine apart, are there any signs that a specific problem exists? If so, are there any diagnostic tests such as compression or crankcase leak down that are worth performing? Before tearing your engine down, asses the specific problem with you're engine if you're rebuilding due to a running problem. Clean Machine - Take time to thoroughly clean the machine before opening up the engine, especially if you will be servicing the top end without removing the engine from the machine. Service Manual - Performing engine maintenance without an OEM factory service manual is not recommended. Make sure you have a manual for your machine prior to starting work. The manual is the only place you’ll find service limits, torque specs, and other key data. Disassembly Limit Contaminants - Once the cylinder has been removed wrap a clean, lint-free rag around the top of the crankcase. Dirt is one of the leading causes of engine wear, and limiting the opportunity for dirt to enter the crankcase is very important. Keep a lint-free rag at the top of the crankcase at all times while it is open and exposed to potential contaminants. Piston Removal - Easy piston circlip removal can be accomplished by using a pick and needle nose pliers. Insert the pick into the dimple in the piston and behind the circlip. Then use it as a lever and pry the circlip out partially. Once out partially, grab the circlip with needle nose pliers. During this process, be careful not to scratch or mar the wrist pin bore as this will make removing the wrist pin much more difficult. Use tools as needed to aid in circlip removal, but be careful not to mar the pin bore so the wrist pin can be easily removed. The ease of pin removal will be largely dependent on the engine design and condition of the bore. If the pin can be removed by hand, great, if not, light tapping while supporting the rod is permissible. Otherwise, a pin puller should be utilized which can be bought or made. In its simplest form, this can consist of an appropriately sized bolt, nut, and socket. Once the wrist pin has been removed, the piston can be removed from the rod. Hopefully, the wrist pin can be removed by hand once the circlip is out. If not, an appropriately sized socket with some light tapping from the opposite end can help break it loose. Power Valve Disassembly - Prior to taking the power valve system apart, spend some time reviewing the procedure in your service manual. For additional insight into how the components interact, review the exploded views in the service manual and look at part microfiches, which can be found online. Online microfiches can be very helpful to double-check reassembly of the power valve. They can be found on many motorcycle dealer websites. When removing the power valve system, consider laying the components out on a clean rag in an orientation that correlates to how they are installed in the engine. This is a relatively simple thing to do that will help you remember how they are installed later. When it comes to cleaning the components, clean them one at a time or in small batches so that they don’t get mixed up. Lay out all the parts of your power valve assembly as you disassemble it. This will help you keep everything organized, and make sure you get it back together correctly. Inspection Reed Valve - Don’t forget to check the condition of the reed valve petals, cage, and any stopper plates. Most service manuals will detail the acceptable clearance between the petal tips and cage as well as the stopper plate height. Ensure any rubber coatings on the reed cage are in good condition. Inspect all reed valves components thoroughly before reassembling the top end. Any parts showing signs of excessive wear or damage should be replaced. Intake Manifold - Check the intake manifold for cracks. Cracks are more common on older engines, and propagation all the way through the manifold can lead to air leaks. Exhaust Flange - Check the condition of the exhaust flange and ensure that it is not excessively worn. An excessively worn flange will make exhaust gas sealing difficult, hamper performance, and leak the infamous spooge. Power Valve Components - Take a moment to review the condition of all the power valve components. Significant wear can occur over time and lead to performance losses. Rod Small End - Check the small end rod bore for surface defects such as pitting, scratches, and marring. Any severe defects in the bore will necessitate rod replacement. The rod small end is a critical point of inspection. Any damage to the inside surface could affect the small end bearing, leading to a chain of top end problems and potential failure. Sourcing New Components When freshening up the top end in your two-stroke, it’s important to reassemble with quality components. A deglazed and honed or bored and replated cylinder is a critical component to ensuring reliable performance from your new top end. Your local cylinder shop should be able to handle the bore and replate when necessary, and a simple deglazing can be accomplished with a Scotch-Brite pad. Be sure to retain the 45-degree honing mark angle. There are a lot of choices for new pistons from the aftermarket out there, but many people choose to stick to OEM. However, when ordering from the OEM, every individual part must be ordered separately, including the piston, ring, pin, clips, gaskets, etc. Dealing with all these part numbers and chancing forgetting a component can be a pain, and get expensive. ProX two-stroke pistons are manufactured by OEM suppliers, and come with the piston, pin, ring(s), and circlips all under one part number. ProX two-stroke pistons are manufactured by the same OEM-suppliers to exact OE specs. They are available in A, B, C, and D sizing for most applications. ProX pistons come with the piston, ring(s), pin, and clips all in one box. Complete top-end gasket kits can even be ordered under one part number. ProX pistons provide an OEM-replacement option with less hassle and less strain on your wallet. Find ProX pistons for your bike here. Even though ProX pistons are made by OE suppliers, the quality control difference is evident. On the left is a ProX piston for a Honda CR250, and on the right is a brand new piston out of the box from Honda. Which would you choose? Measurements The number of measurements that should be taken throughout the top end rebuild will be discretionary. At ProX, we strive for excellence and err on the side of caution when it comes to engine building, so our builds consist of numerous measurements and inspections prior to reassembly. For us, this ensures a high level of confidence and safeguards against external oversights. We recommend the same to anyone building an engine. Below is a list of measurements that we routinely make when rebuilding a two-stroke top end: Piston ring end gaps Piston-to-cylinder clearance Rod small end diameter Out of these measurements, confirming or adjusting the ring end gaps is by far the most important, followed closely by ensuring the cylinder bore is within spec with respect to diameter, straightness, and roundness. Understandably, some measurements may be difficult for the average home builder to execute, usually due to not having the right equipment, however, a competent shop should be able to assist. Ring end gaps can be checked by installing the ring in the bore without the piston, and using a feeler gauge to find the measurement. Correct ring end gap is listed in the installation instructions that come with a new ProX piston. ProX rings often do not need to be filed as they are pre-gapped, but it's always a good idea to make sure your end gap is within the provided spec. Piston-to-cylinder is another measurement that should be checked before final assembly. For this, use a bore guage and a set of calipers to measure the bore size. Next, grab a set of micrometers and measure the piston. ProX pistons should be measured perpendicular to the wrist pin, a quarter of the way up the piston skirt from the bottom. Subtract your piston size measurement from your bore size, and you have your piston-to-cylinder clearance. ProX pistons come with a chart on the instruction sheet that shows the range your clearance should be in. Measuring piston-to-cylinder clearance is a smart precaution to help ensure you won't run into any unexpected issues with your new top end. A final measurement we recommend taking is the rod small end diameter. This is important because sometimes these can get worn out and create free play for the small end bearing, resulting in damage to the bearing and most likely the entire top end. It can be done using the same method as the bore diameter. Compare your measurement to the acceptable range in your owner's manual. Making sure the diameter of the small end of the rod is within spec is often overlooked, but can prevent a serious top end failure. Prep Work Cylinder Cleaning - Once the cylinder has been deglazed or has come back from replating, it should be cleaned one final time. There is almost always leftover honing grit that will need to be removed. To effectively clean the cylinder, use warm soapy water and a bristle brush, followed by automatic transmission fluid or a similar cleaning solution and a brush or lint-free rag. To check the cleanliness of the cylinder, rub a cotton swab around the bore and look for contaminants. Clean the bore until no contaminants are visible on the cotton swab. Any honing grit that remains in the cylinder will facilitate premature wear of the piston rings. A clean, de-glazed, and properly honed cylinder is key to piston and ring function and longevity. Power Valve Function - Cylinders that have been exchanged or replated should have the power valve system reinstalled ahead of final installation. Often times, excess plating can inhibit power valve movement. To correct this, the excess plating must be carefully removed. On cylinders utilizing blade style power valves, the blade position with respect to the cylinder bore should be checked to ensure the blade does not protrude into the bore. Assemble the power valve before installing the new piston and reinstalling the cylinder. Be sure to check that the power valve is moving as it should, and not protruding into the bore. Piston - It is usually easiest to prepare the new piston as much as possible by installing one of the circlips and the ring pack ahead of joining it to the connecting rod. Unless your service manual dictates which circlip must be installed first, choose the easiest installation orientation. Typically, your dominant hand and preferred work orientation will dictate which side you choose to install the circlip on. It's easier to install one clip and the piston ring(s) before fixing the new piston to the connecting rod. Reference your service manual to determine the correct orientation of the circlip. Usually, the open end of the circlip should be oriented to the 12 or 6 o’clock position. Temporarily install the wrist pin and use it as a backstop so that the circlip is forced to move into its groove. Installing the circlip should be done by hand to limit the chance of deformation. Orient the circlip to the desired position, then push the open ends of the circlip into position first. Be careful not to scratch or mar the wrist pin bore in the process! Once installed, use a pick or screwdriver to confirm the circlip is fully seated and does not rotate. Any circlips that can be rotated must be replaced because they have been compromised and deformed during installation. Make sure to note the orientation of each clip after installation. Some manuals may recommend specific positions depending on the piston, but always be sure the gap is not lined up with or near the dimple(s). Rings - The compression ring(s) will be directional, and the top of the ring is typically denoted by markings near the end gaps. Apply a thin coat of oil to the ring, then carefully work the ring into position, making sure to line up the ring end gaps with the locating pin in each ring groove. Install the ring(s) with the marking(s) facing up, and make sure the ring end gap is lined up with the locating pin in the ring groove. Installation Piston - On the top of the piston, an arrow will be imprinted, which typically denotes the exhaust side of the piston. Consult your service manual to confirm the proper orientation of the arrow and piston. Apply a light amount of assembly lube to the small end bearing and wrist pin bore on the piston, then install the bearing. Align the piston with the small end of the rod, and slide the wrist pin into place. Once again, use the wrist pin as a backstop, then install the remaining circlip into position. Use a pick or screwdriver to confirm it is fully seated and does not rotate. Don't forget to apply some assembly lube to the ring and piston skirts before assembly! Cylinder to Piston - In most applications, a ring compressor is not required to compress the rings and install the piston into the cylinder. Lightly oil the cylinder bore with assembly lube or engine oil, then lube the piston skirt and ring faces. Prior to installing the piston and rings, confirm one final time that the piston ring ends are oriented correctly to their respective locating pins. Once the new piston is installed on the connecting rod, apply some assembly lube to the cylinder wall, and carefully slide the cylinder over the piston. Squeeze the ring with your hand as you slide the cylinder on, simultaneously making sure the ring end gap remains aligned with the locating pin. Position the piston at or near TDC then carefully lower the cylinder bore down onto the piston. Use your fingers to compress the ring(s) and ensure the cylinder bore is square to the piston. Feel how easily the cylinder slides over the piston and rings. The installation of the cylinder should be smooth and offer little resistance. If resistance is felt, stop immediately and assess the ring pack. Occasionally one of the rings may come out of position in its groove and snag the cylinder bore. This typically happens as the ring transitions out of your fingers and into the cylinder bore. Once the cylinder is safely over the ring, slide it all the way on keeping the piston at top dead center (TDC). Don't forget to torque your cylinder and head nuts to the specification listed in your manual. Post Build Torquing - Your cylinder and head nuts should always be torqued to the specifications outlined in your service manual. Double check all the nuts are set at their corresponding specs. Spark Plug - Don’t forget to install a new spark plug and if necessary gap it appropriately. Air Filter - Be sure to install a clean air filter prior to start up. Crankcase Leak Down Test - As one final precautionary measure perform a crankcase leak down test. A crankcase leak down test will help confirm all the seals, gaskets, and joints are sealing as they should. Break-In - When running your new top end for the first time, keep the engine slightly above idle, with slow and mild revs until the engine starts to get too hot to touch. Then, shut the engine off and let it cool until it is warm to the touch. Repeat this process, revving slightly higher and letting the engine get partially hotter each time. After 3 cycles like this, let the engine completely cool, then check all your fluids and re-check the torque on your cylinder and head bolts. Once that is squared away, you can begin break-in runs riding the bike. Make sure to keep the RPMs varied while riding for the first time, not letting the engine lug or sit at idle. A safe bet would be to ride the bike like this for 5 minutes, then 10 minutes, and finally 15 minutes, with adequate cooling in between. This will ensure your piston ring(s) are evenly and properly broken in. It’s never a bad idea to double check your fluids and torque one more time after complete cool down.
 -
Hi guys, first timer posting (and first timer with a 2 stroke too), bought a rm85 bored to 52mm (aprox) some days ago, and I decided to pop the cylinder head out, I´m not seeing any big scratches rather than a scary "chip" between the ports, I was about to pop the cylinder out to measure the piston, but this definitely stops me from doing anything, what can I do? I can feel it with my nail. I don´t think replating is an option here where I live. Also, I can see some scratches in the piston if I see through the exhaust port. The piston has some side to side play too, I don´t know if that´s too bad. Greetings! .
-
Anyone use and like wiseco pistons? Have to bore my cylinder to 67 and fit a wiseco as that is the best over size brand I can get lol. 804m06700 is the piston, 03 yz250 sleeve cylinder. How many hours do youse get out of them? Not racing, bush riding but not slow riding either. Kinda fast. What is the clearance you set them up at? Forged piston and a sleeved cylinder. Tia.
-
Rebuilding the top end on my 1999 YZ125, what is the best method of honing to bring back the cross hatches? What color Scotch-Brite? Green or red? Also anything that would help out a first top end rebuild, I see all these threads about people rebuilding the top end & it blows in a few hours. I do not want that to be my case, it seems so simple why are people running into complications? Thanks!
-
My cr125 was knocking only at idle and I pulled the pipe off and it looks like my powervalve is cracked. Is this causing my issue?
-
So I’m doing a total rebuild of a $500 2000 KX125 that “just needed a top end” .... I found it needed a cylinder weld and replate (big gouges) and the head trashed when I went to look at it. Bought it and noticed some rod play in the crank and took no chances. Ended up rebuilding the whole motor going with new oem crank, I don’t trust the hot rods lol. Had no luck finding a new or used cylinder head for this run 99-02 of the kx. Is my head too far gone to return to stock? Should I mill it for race gas? Also what are stock squish settings for this head for a starting point when milling?
-
I’m thinking I can get away with running this cylinder after a hone what do you guys think? Nothing catches the nail but up and down streaks is definitely visible
-
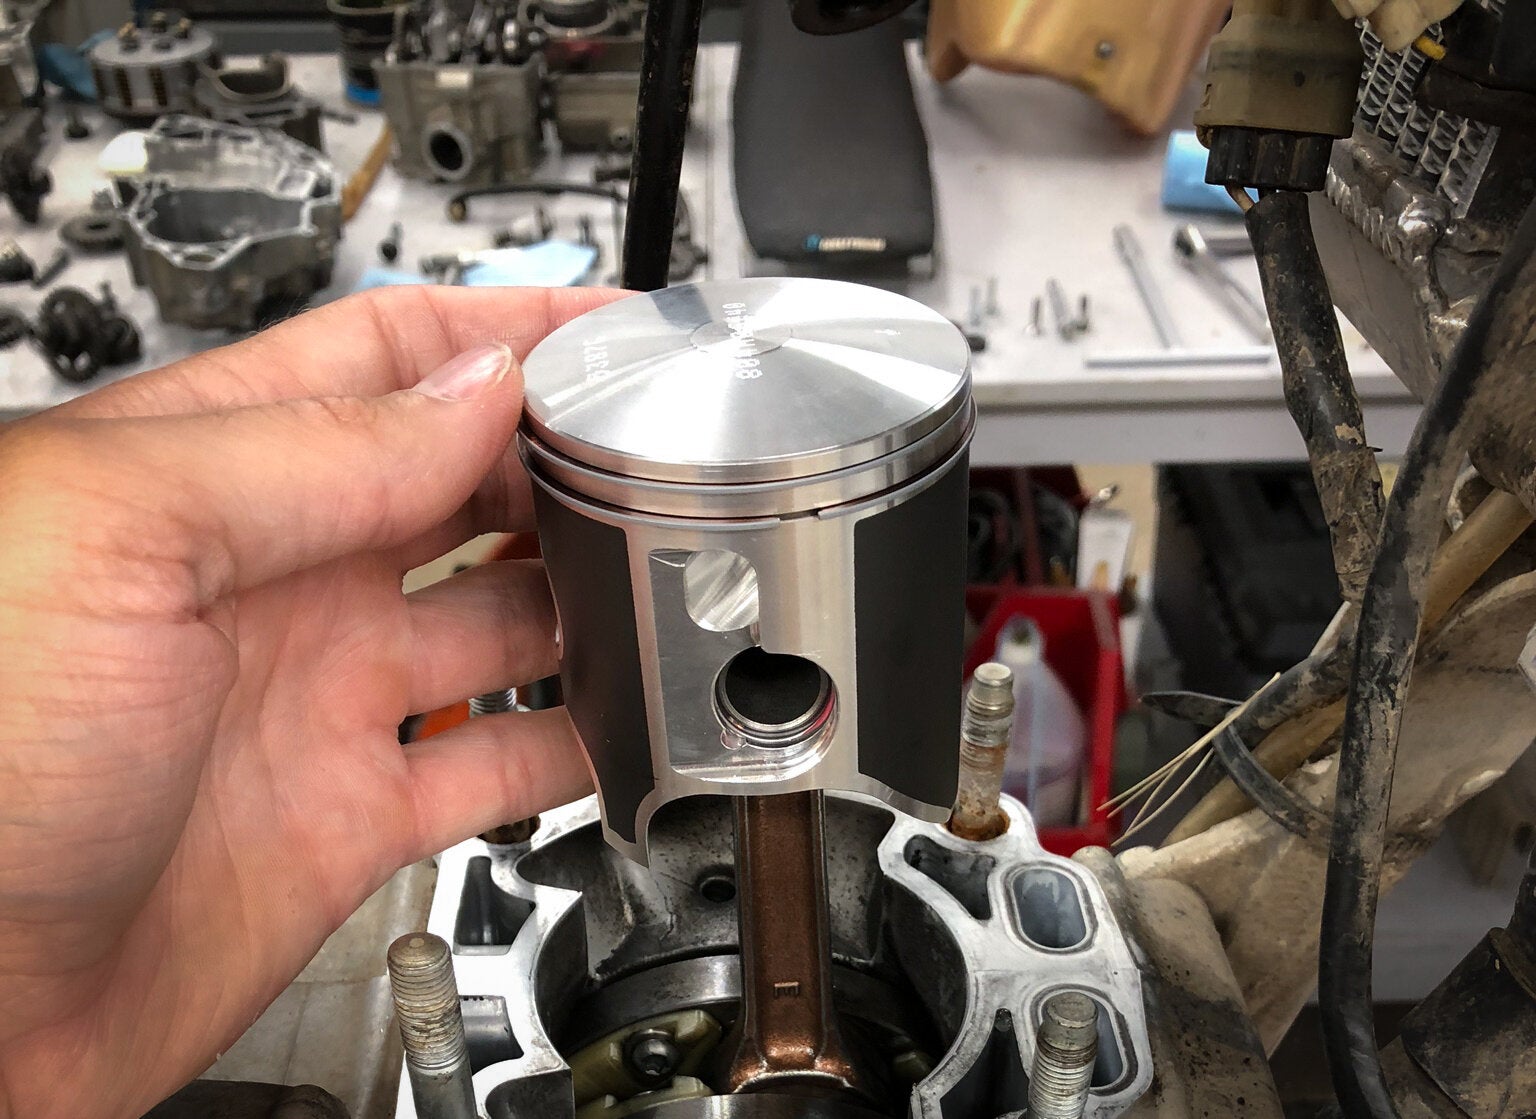 Top-end rebuilds are a necessary maintenance task associated with high performance off-road two-stroke motorcycle ownership. The common belief is that performing a top-end rebuild is a simple task that anyone can do, which is true, however, the devil is in the details. Sloppy, incomplete, or top-end builds done wrong can jeopardize performance, reduce reliability, and ruin the bottom end in the process. At Wiseco, we’ve been manufacturing top-end two-stroke engine components for decades and have been building engines for just as long. To ensure your Wiseco top-end parts run trouble free, we’ve put together some top-end rebuild tips that will ensure your next build is your best build. These tips will be discussed chronologically and will encompass all phases of the build from diagnosis and preparation, to disassembly, through post build. The tips we’re going to share shouldn’t be considered inclusive of everything that has to be done but are tips that focus on things that are either often overlooked or incredibly important. Let’s dive in! Before Teardown Pre-teardown activities can be an insightful way to help pinpoint any internal issues and prepare for upcoming work. Check out these three pre-teardown tasks that will streamline the whole process. Diagnosis - Before tearing the engine apart, are there any signs that a specific problem exists? If so, are there any diagnostic tests such as compression or crankcase leak down that are worth performing? Service Manual - Performing engine maintenance without an OEM factory service manual is not recommended. Make sure you have a manual for your machine prior to starting work. The manual is the only place you’ll find service limits, torque specs, and other key data. Clean Machine - Take the time to thoroughly clean the machine before opening up the engine, especially if you will be servicing the top-end without removing the engine from the machine. Need some tips on knowing when to replace your piston? We have a guide here. It doesn't have to be spotless, but cleaning off excessive dirt and mud can make it a lot easier to keep debris out of citical components during your rebuild. Disassembly Perform disassembly steps methodically and be cognizant of the fact that the bottom end of the engine will be exposed to the elements. Take every precaution to ensure dirt, debris, and hardware does not get into the bottom end. Bearings and other running surfaces have an incredibly low tolerance for dirt, no matter how little. Protect the bottom end - Once the cylinder has been removed, wrap a clean, lint-free rag around the top of the crankcase. Keep your bottom end components protected with a clean rag covering the exposed crankshaft opening. Piston removal - Easy piston circlip removal can be accomplished by using a pick and needle nose pliers. Insert the pick into the dimple in the piston and behind the circlip, then use it as a lever and pry the circlip part way out. Once part way out, grab the circlip with needle nose pliers. During this process, be careful not to scratch or mar the wrist pin bore, as this will make removing the wrist pin much more difficult. The ease of pin removal will be largely dependent on the engine design and condition of the bore. If the pin can be removed by hand, great, if not, light tapping while supporting the rod is permissible. Otherwise, a pin puller should be utilized, which can be bought or made. In its simplest form, this can consist of an appropriately sized bolt, nut, and socket. Once the wrist pin has been removed, the piston can be removed from the rod. Removal of your old piston should be carefully handled. Cautiously remove the circlip and the wrist pin to get the piston off the connecting rod. Carelessness during this step could damage your connecting rod or crank. Power Valve Disassembly - Prior to taking the power valve system apart, spend some time reviewing the procedure in your service manual. For additional insight into how the components interact, review the exploded views in the service manual and look at part microfiches which can be found online. When removing the power valve system, consider laying the components out on a clean sheet of paper in an orientation that correlates to how they are installed in the engine. This is a relatively simple thing to do that will help you remember how they are installed later. When it comes to cleaning the components, clean them one at a time or in small batches so that they don’t get mixed up. Take note of how your powervalve is assembled and operates before taking the components off for cleaning. Inspection Meticulously check all the top-end parts to ensure they are in good working condition. Rotate the crankshaft by hand and feel for smoothness in the crank and rod bearings. Review the items below for often overlooked inspection opportunities. While the top end is apart, inspect your connecting rod and crankshaft to ensure everything is in good operating order. Reed Valve - Don’t forget to check the condition of the reed valve petals, cage, and any stopper plates. Most service manuals will detail the acceptable clearance between the petal tips and cage as well as the stopper plate height. Ensure any rubber coatings on the reed cage are in good condition. Intake Manifold - Check the intake manifold for cracks. Cracks are more common on older engines, and if they propagate all the way through the manifold, can lead to air leaks. Exhaust Flange - Check the condition of the exhaust flange and ensure that it is not excessively worn. An excessively worn flange will make exhaust gas sealing difficult, hamper performance, and leak the infamous spooge. Power Valve Components - Take a moment to review the condition of all the power valve components. Significant wear can occur over time and lead to performance losses. Rod Small End - Check the small end rod bore for surface defects such as pitting, scratches, and marring. Any severe defects in the bore will necessitate rod replacement. New Parts Once you’ve disassembled the engine and have a full picture of any issues, make a list of everything you’ll need to replace. At the very least, you’ll likely be replacing the piston and top-end gaskets. Forged piston kits are available from Wiseco for a wide range of applications, and include the piston, ring(s), wrist pin, and circlips. Many applications can also be purchased with a complete top-end gasket kit from Wiseco. Wiseco pistons are available with features and pricing ranging from reliable replacement to race-focused. Replace your top end with quality components. Shown is Wiseco's Racer Elite two-stroke piston kit. Check out everything Wiseco offers for your machine here. Trying to decide between single-ring and two-ring? Check out our explanation here. Measurements The number of measurements that should be taken throughout the top-end rebuild will be discretionary. At Wiseco, we strive for excellence and err on the side of caution when it comes to engine building, so our builds consist of numerous measurements and inspections prior to reassembly. For us, this ensures a high level of confidence and safeguards against external oversights. We recommend the same to anyone building an engine. Below is a list of measurements that we routinely make when rebuilding a two-stroke top-end: Piston ring end gaps Checking ring end gap involves inserting the piston ring into the bore and using feeler gauges to determine how large of a gap there is. You should compare your measurement to the spec outlined in your owners manual or piston instructions. Rings commonly come pre-gapped, but some fine-tuning may be required after measuring. Ring end gaps should be filed evenly, small portions at a time to reach the desired spec. Piston ring to ring groove clearance This measurement is double-checked by Wiseco during manufacturing, but it never hurts to double-check. Ring to ring groove clearance should also be checked and compared to the recommended spec in your manual/piston instructions. Piston to cylinder clearance Measuring piston to cylinder wall clearance involves measuring the diameter of the piston and subtracting that from the bore diameter. Be sure to follow your piston instructions on measuring your piston at the proper gauge points. Wrist pin to piston clearance Please note, pin fit is done by Wiseco during manufacturing, but if you have the tools, it's always a good idea to double check. Making sure your piston has proper clearance involves measuring the wrist pin diameter and subtracting that from the pin bore diameter. This can accomplished using a bore gauge set and a micrometer. Rod small end diameter Power valve components Out of these measurements, confirming or adjusting the ring end gaps is by far the most important, followed closely by ensuring the cylinder bore is within spec with respect to diameter, straightness, and roundness. Understandably, some measurements may be difficult for the average home builder to execute, usually due to not having the right equipment, however, a competent shop should be able to assist. Prep Work Before putting everything back together, take the time to prepare individual components so they aren’t overlooked or forgotten. Cylinder Cleaning - Once the cylinder has been deglazed or has come back from replating, it should be cleaned one final time. There is almost always leftover honing grit that will need to be removed. To effectively clean the cylinder, use warm soapy water and a bristle brush followed by automatic transmission fluid and a brush or lint-free rag. To check the cleanliness of the cylinder, rub a cotton swab around the bore and look for contaminants. Clean the bore until no contaminants are visible on the cotton swab. Any honing grit that remains in the cylinder will facilitate premature wear of the piston rings. Cylinder prep is incredibly important for a top end rebuild. Make sure your cylinder's plating is in good condition and it is properly deglazed, honed, and cleaned. Read our complete guide to cylinder prep here. Does your cylinder need the exhaust bridge relieved? We explain that here. Power Valve Function - Cylinders that have been exchanged or replated should have the power valve system reinstalled ahead of final installation. Often times, excess plating can inhibit power valve movement. To correct this, the excess plating must be carefully removed. On cylinders utilizing blade style power valves, the blade position with respect to the cylinder bore should be checked to ensure the blade does not protrude into the bore. Make sure your power valve is reassembled and functioning properly before reinstalling the cylinder. Piston - It is usually easiest to prepare the new piston as much as possible by installing one of the circlips and the ring pack ahead of joining it to the connecting rod. Unless your service manual dictates which circlip must be installed first, choose the easiest installation orientation. Typically, your dominant hand and preferred work orientation will dictate which side you choose to install the circlip on. Reference your service manual to determine the correct orientation of the circlip. Usually, the open end of the circlip should be oriented to the 12 or 6 o’clock position. Temporarily install the wrist pin and use it as a backstop so that the circlip is forced to move into its groove. Installing the circlip should be done by hand to limit the chance of deformation. Orient the circlip to the desired position, then push the open ends of the circlip into position first. Be careful not to scratch or mar the wrist pin bore in the process! Once installed, use a pick or screwdriver to confirm the circlip is fully seated and does not rotate. Any circlips that can be rotated must be replaced because they have been compromised and deformed during installation. It's easiest to install your ring pack and one circlip before installing the piston on the small end of the rod. Rings - The compression ring(s) will be directional, and the top of the ring is typically denoted by markings near the end gaps. Apply a thin coat of oil to the ring, then carefully work the ring into position. Ensuring the ring end gaps are lined up with the locating pins is crucial to proper 2-stroke engine operation. Read more about locating pins here. Installation Carefully work through the installation process by paying attention to the small details. Double check instructions and don’t force anything that feels abnormal. Be especially careful when mating the cylinder to the piston assembly. Piston - On the top of the piston, an arrow will be imprinted, which typically denotes the exhaust side of the piston. Consult your service manual and/or instructions that came with your piston kit to confirm the proper orientation of the arrow and piston. Apply a light amount of assembly lube to the small end bearing and wrist pin bore on the piston, then install the bearing, align the piston with the small end of the rod, and slide the wrist pin into place. Once again, use the wrist pin as a backstop then install the remaining circlip into position. Use a pick or screwdriver to confirm it is fully seated and does not rotate. When installing the new piston on the connecting rod, make sure the piston is correctly oriented, usually with the appropriate marking facing the exhaust side. Also, apply lube to the new small end bearing and wrist pin bore. Cylinder to Piston - In most applications, a ring compressor is not required to compress the rings and install the piston into the cylinder. Lightly oil the cylinder bore with assembly lube or engine oil. Then, lube the piston skirt and ring faces. Prior to installing the piston and rings, confirm one final time that the piston ring ends are oriented correctly to their respective locating pins. Before sliding the cylinder onto the new piston, apply some lube to the piston skirts, ring faces, and clyinder wall. It's critical to make sure the ring end gaps remain correctly oriented with their locating pins throughout cylinder installation. Position the piston at or near TDC, then carefully lower the cylinder bore down onto the piston. Use your fingers to compress the ring(s) and ensure the cylinder bore is square to the piston. Feel how easily the cylinder slides over the piston and rings. The installation of the cylinder should be smooth and offer little resistance. If resistance is felt, stop immediately and assess the ring pack. Occasionally, one of the rings may come out of position in its groove and snag the cylinder bore. This typically happens as the ring transitions out of your fingers and into the cylinder bore. When installed correctly, the new piston should move smoothly up and down in the bore without any snags or notchiness. Always make sure to torque your cylinder and head bolts to the spec outlined in your owners manual. Tighten the head bolts in a star pattern to prevent warpage. Post Build Before firing up your fresh top-end, do these three things to ensure the engine performs optimally. Crankcase Leak Down Test - As one final precautionary measure, perform a crankcase leak down test. A crankcase leak down test will help confirm all the seals, gaskets, and joints are sealing as they should. Spark Plug - Don’t forget to install a new spark plug, and, if necessary, gap it appropriately. Air Filter - Be sure to install a clean air filter prior to start up. A crankcase leakdown test can help ensure your new rings are sealing properly before initial fire up. Ready to break in the engine? Check out our complete motorcycle engine break in guide here. Wrap Up Top-end rebuilds shouldn’t be taken for granted or oversimplified since they deal with the heart of the engine. With adequate preparation, the right tools, attention to detail, and the appropriate knowledge, top-end rebuilds can be performed by anyone and yield great results. At Wiseco, we’ve performed countless engine builds and hope the information we’ve shared makes your next engine build go smoothly and successfully. This YZ250 engine is ready to rip like new again with a fresh Wiseco top end!
- 13 comments
-
- 9
-
-
-
- 2-Stroke
- Two-Stroke
- (and 7 more)
-
Having a hard time finding a replacement cylinder for my 09' 300, haven't done this before so am I just not looking in the right place or can I not buy a cylinder by itself for this bike? Seems like they're only sold as factory big bore kits for the 250 and i dont need the power valve/linkage, cdi etc.. Can anybody point me in the right direction or tell me if that's the only way to get one or what..? I'd appreciate it alot, athena seems to have a ton but I can't seem to find one for the 300 their site isn't too helpful and idk the part#, not sure why it's so difficult I must be going about it wrong or something. Thanks...
-
Hi everyone, Thank you in advance for any help. So this may seem like a stupid question, but just need someone else's opinion. I have a 2003 Honda CR250. I noticed on my last top end that my nikasil was starting to chip near the lower corner of the exhaust opening. Also I noticed a hairline crack in the nikasil at the top of the exhaust bridge. I decarboned and cleaned everything up really well and didn't notice any cracks in the actual cylinder, but that doesn't mean there isn't one. If I send it for plating I'm sure they will know better then myself. I don't have nearly the time I wish I had to ride so my hours are limited, and want to do it right but keep it as affordable as possible. So I thought about sending the cylinder to powerseal usa, they seem to have a good rep. Their website says $207. to strip and replace nikasil, then if it does need welded another $60.00 for that. Plus the shipping costs there and back, so around $300 if it does need welded. Or do I just order another oem cylinder for around $400.00. Would there job hold up as well or better than the oem? The extra hundred would pay for a large portion of the the piston, rings, bearing, gaskets, etc. I usually use all oem parts when available so I will probably get oem gaskets, wrist pin, bearing. The piston isn't available oem, so I was thinking of either a pro-x or a vertex. Any opinion on which piston I should get? I just like having opinions of people that ride and work on bikes. Thanks again, Jason
-
I am in the process of doing a top end on my 07 and I noticed I can count the amount of cross hatching I have on this cylinder. I was going to hone it, but now I’m considering getting it re-plated. What would you guys do?
-
 Profile and ovality are two main characteristics of piston design. Here we'll take a look at why pistons are designed to not be perfectly round. When you look at a piston, it is easy to think that they are a perfectly round, cylindrical shape. After all, they go into a round hole (the cylinder!) So why shouldn’t they also be round? The fact is, the external shape of a piston is very sophisticated. An internal combustion engine is a hostile environment where combustion gasses can reach dangerous temperatures, and there could be port windows and surface undulations from uneven cylinder cooling. Designing a piston that is optimized for combustion chamber conditions is an important challenge. Throughout the years, piston materials and design characteristics to compensate for expansion under heat have evolved. Forging pistons out of aluminum provides great strength and durability, but it must be used in the correct design to properly optimize the performance of the piston. (Left) These are an example of early piston design, using steel as the primary material. These would not be sufficient for the requirements of modern engines. Compare with the variety of modern forged aluminum pistons from Wiseco (right) featuring different coatings and designs. Read more about the forging process here. There are two major characteristics of piston shapes: profile and ovality. Wiseco's Product Manager and long time engineer Dave Sulecki commented on these piston characteristics: “Piston profile and ovality are one of the most important features of a piston, these really determine not only how the piston will wear over time, but also how well the piston can perform. When the engineer calculates the piston to cylinder clearance, this is only the beginning of a complex determination of the final piston geometry." Profile If you roll a piston across a flat surface, you'll notice it does not roll in a straight line. You are observing characteristic number one: profile. Because aluminum conducts so much heat, pistons are designed with a taper -- the top of the piston, near the crown, is a smaller diameter than the bottom of the piston, near the skirt. The skirt of the piston actually is designed with what is called a barrel shape, illustrated below. This is beacuase temperatures near the dome of the piston vary from the temperatures at the skirt of the piston, resulting in different levels of expansion. The tapered shape allows the piston to expand as heat is applied, so the piston does not bind in the cylinder bore. The higher the temperature, the more the piston will expand. The design challenge then becomes calculating the degree of taper. Too tight of clearance can induce scuffing or seizure from heat expansion, while too loose of clearance can introduce noise from piston rock. This illustration shows piston profile: the barrel shape and taper pistons have. Because of this, measuring diameter on the skirts yields a larger number than measruing near the dome. "The piston profile is critical to how the piston will support itself as it reciprocates in the cylinder bore. For example, the piston profile must help hold the piston vertical in the bore during combustion; imagine any excess leaning of the piston would allow piston rings to become “unseated” and not seal properly against the cylinder wall," elaborates Sulecki. Ovality As you roll the piston across the table, you will also observe the piston rising and falling in a “hump-hump-hump” motion, much like a wheel that has a flat spot. This characteristic is called ovality, also known as camming. In the simplest terms, ovality means that the piston is smallest in line with the wrist pin bore. As the engine begins its movement, the connecting rod is not moving only up and down, but due to the rotation aspect is simultaneously moving sideways. This action from the connecting rod and the motion of the crankshaft place load forces on the piston along the plane of the connecting rod inline with rotation (known as the “thrust axis”). To allow the piston to move freely with this sidelong force, the piston cannot be perfectly round, or it would bind in the round cylinder bore. By applying ovality to the piston, the piston is free to move up and down as needed. The challenge in design is applying the proper amount of ovality. Too little ovality can cause the piston to contact the cylinder wall nearest the end of the piston pin, while too much ovality can cause the piston to ride too heavily against the cylinder wall along this “thrust axis.” Too much load along the thrust axis can result in heavy scuffing or seizure, when the piston breaks the oil film barrier and contacts the cylinder wall directly. This illustration shows piston ovality. The solid-lined ellipse represents the diameter of the piston as if you're looking down onto the dome. Dave Sulecki commented on ovality, "Ovality is an unknown thing, when most people look at a piston they think it is round, and to the naked eye this must be the case. However, take a new two stroke piston and roll it across the table and what happens? You will see the uneven “hump, hump, hump” as the piston rolls in a large arc…you are seeing both the profile (the “cone shape” of the piston”, in combination with the ovality as the piston rolls unevenly. Ovality is necessary for the piston to move up and down in the cylinder bore, as the crankshaft and connecting rod try to force the piston upward, and combustion forces the piston downward, ovality allows the piston to move without binding in the round cylinder bore." Your bike's engine need a complete rebuild? Or maybe just a piston and valves? Check out our Garage Buddy line of rebuild kits. Another visual representation of piston profile and ovality. Ovality is a key detail to remember when measuring piston size. The piston must be measured at the bottom of the skirt, 90 degrees from the wrist pin hole to reach an accurate measurement. When measuring piston diameter, be sure you’re using the proper tools. Do not use calipers to measure your piston(s), as you won’t get an accurate measurement. The most accurate tool to use is a set of outside diameter micrometers. Your piston should be measured at the bottom of the skirt, 90 degrees from the pin hole. Please note: The measurements displayed here are for representational purposes only. Measure each of your own individual parts for accuracy. Some Wiseco pistons feature proprietary skirt coatings such as ArmorGlide or ArmorFit, which are designed to reduce wear, provide smoother and quieter operation, and are applied to last for the life of the piston. With certain skirt coated pistons, piston-to-wall clearance measuring specs will change, so be sure to read the instructions that come with your piston(s). Click here to find out more about Wiseco's different coatings.
- 35 comments
-
- 14
-
-